Before Using the Printer
Part Names and Functions
Setting Up
Basic Operations
Useful Functions
Creating a Label with a Special Form
Cleaning the Printer
Preference
Troubleshooting
Product Specifications
Symbol, Accent Mark, Frame
Top > Setting Up > Inserting or removing tape cartridge
Inserting or removing tape cartridge
-
Remove the slack of the ink ribbon.
-
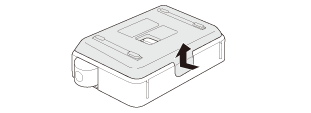
Open the cover on the rear.
-
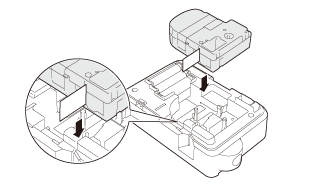
Set the tape cartridge.
-
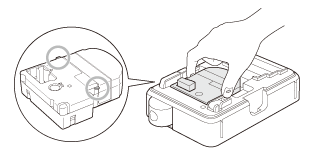
Close the cover.

Press it firmly until it snaps into place.
Make sure the end of the tape slides into the ejection slot.
 Note NoteDo not pull the tape out with your fingers. |
Close it until it snaps into place.
How to remove the tape cartridge
|
Note Hold the cartridge by the tabs, and lift it straight up. |
Before Using the Printer
Part Names and Functions
Setting Up
Basic Operations
Useful Functions
Creating a Label with a Special Form
Cleaning the Printer
Preference
Troubleshooting
Product Specifications
Symbol, Accent Mark, Frame
Top > Setting Up > Inserting or removing tape cartridge
Inserting or removing tape cartridge
-
Remove the slack of the ink ribbon.
-
Open the cover on the rear.
-
Set the tape cartridge.
-
Close the cover.
Press it firmly until it snaps into place.
Make sure the end of the tape slides into the ejection slot.
|
Note Do not pull the tape out with your fingers. |
Close it until it snaps into place.
How to remove the tape cartridge
|
Note Hold the cartridge by the tabs, and lift it straight up. |