-
-
-
-
Printing from the Print Photos Menu on the Control Panel
-
-
-
Network Service and Software Information
-
Application for Scanning Documents and Images (Epson Scan 2)
-
Application for Configuring Scanning Operations from the Control Panel (Epson Event Manager)
-
Application for Quick and Fun Printing from a Computer (Epson Photo+)
-
Application for Easily Operating the Printer from a Smart device (Epson Smart Panel)
-
Application for Scanning and Transferring Images (Easy Photo Scan)
-
Application for Updating Software and Firmware (Epson Software Updater)
-
Application for Setting up the Device on a Network (EpsonNet Config)
-
-
-
Making Wi-Fi Direct (Simple AP) Connection Settings
This method allows you to connect the printer directly to devices without a wireless router. The printer acts as a wireless router.
-
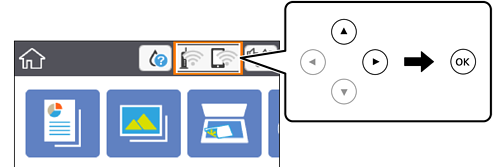
Select
 on the home screen.
To select an item, move the focus to the item using the


 buttons, and then press the OK button.
-
Select Wi-Fi Direct.
-
Press the OK button.
If you have made Wi-Fi Direct (Simple AP) settings, the detailed connection information is displayed. Go to step 5.
-
Press the OK button to start making settings.
-
Check the SSID and password displayed on the printer's control panel.
On the computer's network connection screen or the smart device's Wi-Fi screen, select the SSID shown on the printer's control panel to connect.
-
Enter the password displayed on the printer's control panel on the computer or smart device.
Note:When you enable Wi-Fi Direct, it remains enabled unless you restore the default network settings and disable Wi-Fi Direct.
-
After the connection is established, select Dismiss on the printer's control panel.
-
Press the
 button.
