-
-
-
-
Printing from the Print Photos Menu on the Control Panel
-
-
-
Network Service and Software Information
-
Application for Scanning Documents and Images (Epson Scan 2)
-
Application for Configuring Scanning Operations from the Control Panel (Epson Event Manager)
-
Application for Quick and Fun Printing from a Computer (Epson Photo+)
-
Application for Easily Operating the Printer from a Smart device (Epson Smart Panel)
-
Application for Scanning and Transferring Images (Easy Photo Scan)
-
Application for Updating Software and Firmware (Epson Software Updater)
-
Application for Setting up the Device on a Network (EpsonNet Config)
-
-
-
Loading Paper in the Paper Cassette
-
Open the front cover until it clicks.
-
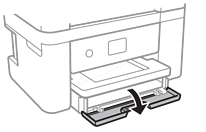
Check that the printer is not operating, and then slide out the paper cassette.
 Important:
The paper cassette cannot be removed.
-
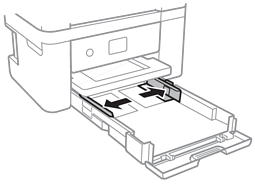
Slide the edge guides to their maximum position.
-
With the printable side facing down, load paper until it touches the back of the paper cassette.
 Important:
Do not load more than the maximum number of sheets specified for the paper.
-
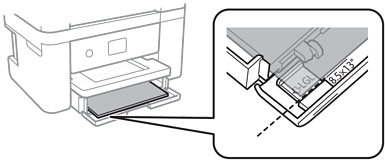
8.5 x 13 in.Load paper using the line.
-
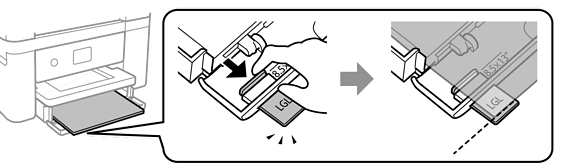
LegalPull out the legal paper guide and load paper using the line.
-
-
Slide the edge guides to the edges of the paper.

-
Insert the paper cassette gently.
-
On the control panel, set the size and type of the paper you loaded in the paper cassette. If your paper size is not displayed, select User-Defined.
To select an item, move the focus to the item using the


 buttons, and then press the OK button.
Note:
buttons, and then press the OK button.
Note:-
You can also display the paper size and paper type settings screen by selecting Settings > Printer Settings > Paper Source Setting > Paper Setup.
-
For letterhead paper, select Letterhead as the paper type.
-
For letterhead paper, if you print on paper that is smaller than the setting in the printer driver, the printer may print beyond the edges of the paper which can lead to ink smears on your printouts and excess ink building up inside the printer. Make sure you select the correct paper size setting.
-
2-sided printing and borderless printing are not available for letterhead paper. Also, the print speed may be slower.
-
-
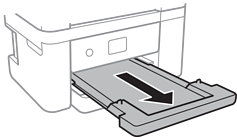
Slide out the output tray.