-
-
-
-
Printing from the Print Photos Menu on the Control Panel
-
-
-
Network Service and Software Information
-
Application for Scanning Documents and Images (Epson Scan 2)
-
Application for Configuring Scanning Operations from the Control Panel (Epson Event Manager)
-
Application for Quick and Fun Printing from a Computer (Epson Photo+)
-
Application for Easily Operating the Printer from a Smart device (Epson Smart Panel)
-
Application for Scanning and Transferring Images (Easy Photo Scan)
-
Application for Updating Software and Firmware (Epson Software Updater)
-
Application for Setting up the Device on a Network (EpsonNet Config)
-
-
-
Aligning the Print Head - Control Panel
-
Load A4-size plain paper in the printer.
-
Select Maintenance on the home screen.
To select an item, move the focus to the item using the


 buttons, and then press the OK button.
-
Select Print Head Alignment.
-
If vertical lines look misaligned or if your printouts look blurry, go to step 5. If you see horizontal banding at regular intervals, go to step 11.
-
Select Basic Alignment, and then follow the on-screen instructions to print an alignment pattern.
-
Follow the on-screen instructions to align the print head.
Find and select the number for the pattern that has the least misaligned vertical line.

-
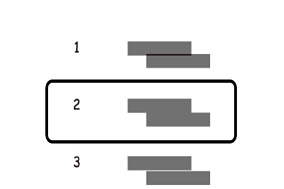
Select Vertical Alignment, and then print an alignment pattern.
-
Find and select the number for the most solid pattern in each group.
-
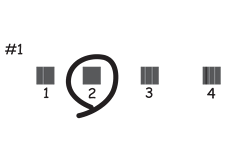
Select Ruled Line Alignment, and then print an alignment pattern.
-
Find and select the number for the pattern that has the least misaligned vertical line.

Alignment is complete.
-
Select Horizontal Alignment, and then follow the on-screen instructions to print an alignment pattern.
-
Follow the on-screen instructions to align the print head.
Find and select the number for the least separated and overlapping pattern.