
Before Using the Printer
Part Names
Setup
Basic Operations
Cleaning
Troubleshooting
Product Specifications
Appendix
Top > Setup > Checking/Changing the Installation Direction
Checking/Changing the Installation Direction
You can select whether to eject paper from the top side or from the front side. The paper eject position can be changed by switching attachment positions of the rear cover and the bottom cover.
The printer is shipped with the covers attached so that paper is ejected upward.
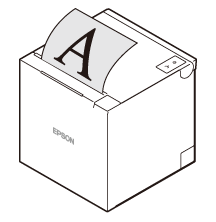
For Ejecting Paper Upward
The roll paper is ejected from the top side, and the roll paper cover opens upward.
For instructions on how to set up the printer to eject paper from the top side, see Attaching the Printer Covers.
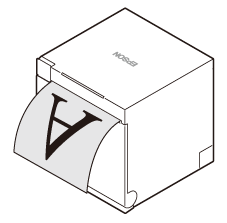
For Ejecting Paper Frontward
The roll paper is ejected from the front side, and the roll paper cover opens frontward.
For instructions on how to set up the printer to eject paper from the front side, see Attaching the Printer Covers.
 CAUTION:
-
Place the printer on a flat surface.
-
Take measures to prevent the printer from moving due to vibrations when using the cash drawer.
-
Do not place the printer in locations subject to high dust levels.
-
Do not give a high impact on the printer during operation. Doing so may cause the print failure.
-
Be careful not to place cords or foreign substances under the printer.
 Note:
Note:You can install the printer as a wall hanging printer if you use the optional Wall Hanging Bracket Set (OT-WH30). Refer to the installation manual of the Wall Hanging Bracket Set for details.
Before Using the Printer
Part Names
Setup
Basic Operations
Cleaning
Troubleshooting
Product Specifications
Appendix
Top > Setup > Checking/Changing the Installation Direction
Checking/Changing the Installation Direction
You can select whether to eject paper from the top side or from the front side. The paper eject position can be changed by switching attachment positions of the rear cover and the bottom cover.
The printer is shipped with the covers attached so that paper is ejected upward.
For Ejecting Paper Upward
The roll paper is ejected from the top side, and the roll paper cover opens upward.
For instructions on how to set up the printer to eject paper from the top side, see Attaching the Printer Covers.
For Ejecting Paper Frontward
The roll paper is ejected from the front side, and the roll paper cover opens frontward.
For instructions on how to set up the printer to eject paper from the front side, see Attaching the Printer Covers.
CAUTION:-
Place the printer on a flat surface.
-
Take measures to prevent the printer from moving due to vibrations when using the cash drawer.
-
Do not place the printer in locations subject to high dust levels.
-
Do not give a high impact on the printer during operation. Doing so may cause the print failure.
-
Be careful not to place cords or foreign substances under the printer.
Note:You can install the printer as a wall hanging printer if you use the optional Wall Hanging Bracket Set (OT-WH30). Refer to the installation manual of the Wall Hanging Bracket Set for details.