
Before Using the Printer
Part Names
Setup
Basic Operations
Cleaning
Troubleshooting
Product Specifications
Appendix
Top > Setup > Connecting Cables
Connecting Cables
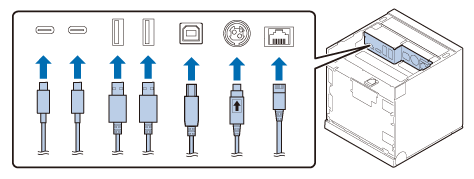
Connect the cable of the AC adapter and cables of your devices, such as a tablet or computer, to the connectors on the bottom of the printer.
-
Remove the printer covers.
-
Connect the AC adapter and the interface cable to the connectors at the bottom of the printer.
-
When using the optional customer display (DM-D30/DM-D70), or the optional wireless LAN unit, connect it to the USB-A connector.
-
If your model has only one USB-A connector and you want to use both the customer display (DM-D30) and the wireless LAN unit, attach the wireless LAN unit to the customer display.
For installation instructions, see the Technical Reference Guide or customer display user's manual. -
Check which direction to eject printed paper, and attach the printer covers accordingly.
How to attach the covers depends on which direction you want to eject printed paper. -
Connect the interface cable to your device such as a tablet or computer.
-
Connect the AC cable plug to a power outlet.

For information on which connector is which type, see Connectors.
 Note:
Note: WARNING:
-
Never insert the AC cable plug into a socket that does not meet the input voltage of the AC adapter. Doing so may result in damage to the printer.
-
Should a fault ever occur, immediately turn off the power to the printer and unplug the AC cable from the socket.
Before Using the Printer
Part Names
Setup
Basic Operations
Cleaning
Troubleshooting
Product Specifications
Appendix
Top > Setup > Connecting Cables
Connecting Cables
Connect the cable of the AC adapter and cables of your devices, such as a tablet or computer, to the connectors on the bottom of the printer.
-
Remove the printer covers.
-
Connect the AC adapter and the interface cable to the connectors at the bottom of the printer.
-
When using the optional customer display (DM-D30/DM-D70), or the optional wireless LAN unit, connect it to the USB-A connector.
-
If your model has only one USB-A connector and you want to use both the customer display (DM-D30) and the wireless LAN unit, attach the wireless LAN unit to the customer display.
For installation instructions, see the Technical Reference Guide or customer display user's manual. -
Check which direction to eject printed paper, and attach the printer covers accordingly.
How to attach the covers depends on which direction you want to eject printed paper. -
Connect the interface cable to your device such as a tablet or computer.
-
Connect the AC cable plug to a power outlet.
For information on which connector is which type, see Connectors.
Note:WARNING:-
Never insert the AC cable plug into a socket that does not meet the input voltage of the AC adapter. Doing so may result in damage to the printer.
-
Should a fault ever occur, immediately turn off the power to the printer and unplug the AC cable from the socket.