
Before Using the Scanner
Part Names
Setup
Basic Operations
Cleaning
Troubleshooting
Product Specifications
Appendix
Top > Part Names > Body
Body
|
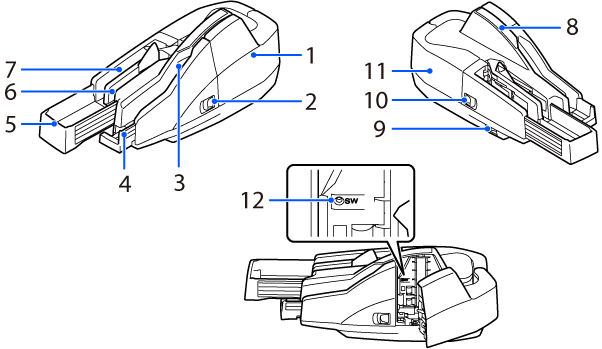
1 |
Scanner cover |
Open this cover to remove jammed paper or to clean the scanner unit. |
|
2 |
Scanner cover open lever |
Move this lever to open the scanner cover. |
|
3 |
ASF (Auto-Sheet-Feeder) |
Load documents here to scan them. Up to 100 sheets can be loaded at a time. |
|
4 |
ASF guide |
Extend this ASF guide to match the length of the documents. |
|
5 |
Pocket guide |
Extend this pocket guide to match the length of the documents. |
|
6 |
Sub pocket |
Processed documents are ejected into these pockets. |
|
7 |
Main pocket |
|
|
8 |
LED indicators |
These LEDs indicate the operating status of the scanner. |
|
9 |
Power switch |
Flip this switch to turn the scanner on or off. |
|
10 |
Franker cover open lever |
Move this lever to open the franker cover. |
|
11 |
Franker cover |
Open this cover to replace the franking cartridge. |
|
12 |
Network button |
This button is located inside the scanner. Open the scanner cover and press the button to initialize the network settings. |

Before Using the Scanner
Part Names
Setup
Basic Operations
Cleaning
Troubleshooting
Product Specifications
Appendix
Top > Part Names > Body
Body
|
1 |
Scanner cover |
Open this cover to remove jammed paper or to clean the scanner unit. |
|
2 |
Scanner cover open lever |
Move this lever to open the scanner cover. |
|
3 |
ASF (Auto-Sheet-Feeder) |
Load documents here to scan them. Up to 100 sheets can be loaded at a time. |
|
4 |
ASF guide |
Extend this ASF guide to match the length of the documents. |
|
5 |
Pocket guide |
Extend this pocket guide to match the length of the documents. |
|
6 |
Sub pocket |
Processed documents are ejected into these pockets. |
|
7 |
Main pocket |
|
|
8 |
LED indicators |
These LEDs indicate the operating status of the scanner. |
|
9 |
Power switch |
Flip this switch to turn the scanner on or off. |
|
10 |
Franker cover open lever |
Move this lever to open the franker cover. |
|
11 |
Franker cover |
Open this cover to replace the franking cartridge. |
|
12 |
Network button |
This button is located inside the scanner. Open the scanner cover and press the button to initialize the network settings. |