
Before Using the Scanner
Part Names
Setup
Basic Operations
Cleaning
Troubleshooting
Product Specifications
Appendix
Top > Basic Operations > Installing and Replacing the Franking Cartridge
Installing and Replacing the Franking Cartridge
 CAUTION:
-
Keep the franking cartridges out of the reach of children.
-
Do not disassemble franking cartridges.
-
Be careful during handling because the ink can permanently stain clothing.
-
For the best performance of the scanner, it is recommended to use genuine Epson cartridges.
Use of non-genuine Epson products can adversely affect the scanner and print quality and prevent the scanner from realizing its maximum performance. -
Do not unpack the franking cartridge until just before installing it. Print quality will deteriorate if the franking cartridge is left unpacked for an extended period of time.
-
Use up the franking cartridge within 18 months from the date of production indicated on the cartridge box.
-
Dispose of franking cartridges in accordance with the laws, ordinances, and regulations of your country or region.
Follow these steps to install a franking cartridge for the first time or to replace it.
-
Open the franker cover.
-
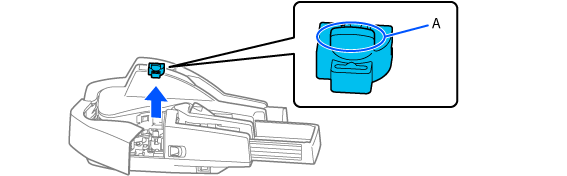
When replacing a used franking cartridge, hold the cartridge by its top knob ("A" in the image below) and remove it upward.
-
Carefully insert a new franking cartridge from the top, and push it firmly but gently until it clicks in place.
-
Close the franker cover firmly until it clicks in place.

Before Using the Scanner
Part Names
Setup
Basic Operations
Cleaning
Troubleshooting
Product Specifications
Appendix
Top > Basic Operations > Installing and Replacing the Franking Cartridge
Installing and Replacing the Franking Cartridge
CAUTION:-
Keep the franking cartridges out of the reach of children.
-
Do not disassemble franking cartridges.
-
Be careful during handling because the ink can permanently stain clothing.
-
For the best performance of the scanner, it is recommended to use genuine Epson cartridges.
Use of non-genuine Epson products can adversely affect the scanner and print quality and prevent the scanner from realizing its maximum performance. -
Do not unpack the franking cartridge until just before installing it. Print quality will deteriorate if the franking cartridge is left unpacked for an extended period of time.
-
Use up the franking cartridge within 18 months from the date of production indicated on the cartridge box.
-
Dispose of franking cartridges in accordance with the laws, ordinances, and regulations of your country or region.
Follow these steps to install a franking cartridge for the first time or to replace it.
-
Open the franker cover.
-
When replacing a used franking cartridge, hold the cartridge by its top knob ("A" in the image below) and remove it upward.
-
Carefully insert a new franking cartridge from the top, and push it firmly but gently until it clicks in place.
-
Close the franker cover firmly until it clicks in place.