
Before Using the Scanner
Part Names
Setup
Basic Operations
Cleaning
Troubleshooting
Product Specifications
Appendix
Top > Cleaning > Cleaning the Image Sensor
Cleaning the Image Sensor
If the image sensor of the scanner becomes dirty with ink, or paper dust, scan quality may deteriorate. Clean the image sensor once a week or every 2,000 scans.
Follow these steps to clean the image sensor.
-
Open the scanner cover.
-
Lightly wipe the image sensor shown in the figure below with a soft, dry cloth.
-
Do not use synthetic detergents, benzene, water or other liquids for cleaning. Using them may cause stains on the glass surface.
-
Never apply any liquid directly to the glass of the scanner.
-
Close the scanner cover firmly until it clicks in place.

 CAUTION:
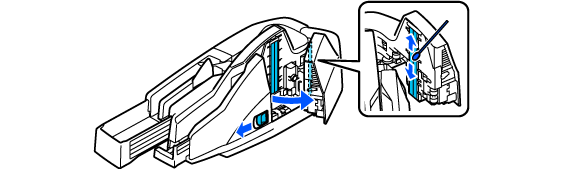
For stubborn stains such as oil or grease, wipe them off with a cloth lightly moistened with alcohol. Then, wipe off the alcohol with a dry cloth.
Before Using the Scanner
Part Names
Setup
Basic Operations
Cleaning
Troubleshooting
Product Specifications
Appendix
Top > Cleaning > Cleaning the Image Sensor
Cleaning the Image Sensor
If the image sensor of the scanner becomes dirty with ink, or paper dust, scan quality may deteriorate. Clean the image sensor once a week or every 2,000 scans.
Follow these steps to clean the image sensor.
-
Open the scanner cover.
-
Lightly wipe the image sensor shown in the figure below with a soft, dry cloth.
-
Do not use synthetic detergents, benzene, water or other liquids for cleaning. Using them may cause stains on the glass surface.
-
Never apply any liquid directly to the glass of the scanner.
-
Close the scanner cover firmly until it clicks in place.
CAUTION:For stubborn stains such as oil or grease, wipe them off with a cloth lightly moistened with alcohol. Then, wipe off the alcohol with a dry cloth.