
Before Using the Printer
Part Names
Setup
Basic Operations
Cleaning
Troubleshooting
Appendix
Top > Part Names > Top/Front/Rear
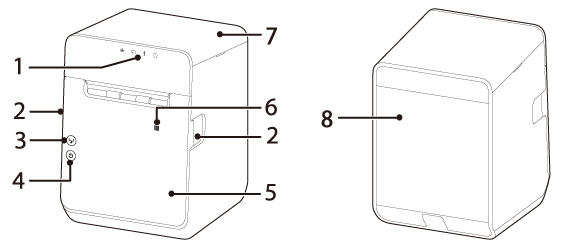
Top/Front/Rear
|
1 |
Panel LED |
The LED lights indicate printer status. |
|
2 |
Cover open lever |
Operate this lever to open the roll paper cover. |
|
3 |
|
Press this button once to feed the roll paper for one line. Hold down this button to continue feeding the roll paper. |
|
4 |
|
This button turns the printer on or off. |
|
5 |
Roll paper cover |
Open this cover when installing or replacing the roll paper. |
|
6 |
NFC Tag |
A mark is printed here to indicate the position of the NFC tag. |
|
7 |
Top cover |
Open this cover if the roll paper cover does not open. |
|
8 |
Rear cover |
Open this cover when connecting the DC cable of the AC adapter, or interface cables of peripheral devices. |
 Feed button
 Power button
Before Using the Printer
Part Names
Setup
Basic Operations
Cleaning
Troubleshooting
Appendix
Top > Part Names > Top/Front/Rear
Top/Front/Rear
|
1 |
Panel LED |
The LED lights indicate printer status. |
|
2 |
Cover open lever |
Operate this lever to open the roll paper cover. |
|
3 |
|
Press this button once to feed the roll paper for one line. Hold down this button to continue feeding the roll paper. |
|
4 |
|
This button turns the printer on or off. |
|
5 |
Roll paper cover |
Open this cover when installing or replacing the roll paper. |
|
6 |
NFC Tag |
A mark is printed here to indicate the position of the NFC tag. |
|
7 |
Top cover |
Open this cover if the roll paper cover does not open. |
|
8 |
Rear cover |
Open this cover when connecting the DC cable of the AC adapter, or interface cables of peripheral devices. |