
Before Using the Printer
Part Names
Setup
Basic Operations
Cleaning
Troubleshooting
Appendix
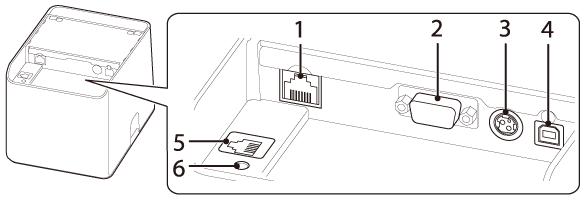
Top > Part Names > Connectors
Connectors
The on-board connectors vary depending on the printer model.

|
1 |
Ethernet connector |
Connects the 10BASE-T/100BASE-TX LAN cable. |
|
2 |
Serial connector |
Connects a serial cable. |
|
3 |
Power supply connector |
Connects the DC cable for the AC adapter. |
|
4 |
USB Type-B connector |
Connects the USB cable for connecting to computers. |
|
5 |
Drawer kick connector |
Connects the modular cable for the cash drawer. |
|
6 |
Status sheet button |
Initializes the interface settings or prints a status sheet to verify the settings. |

|
1 |
Ethernet connector |
Connects the 10BASE-T/100BASE-TX LAN cable. |
|
2,3 |
USB Type-A connector The USB connector color is black |
For connecting a peripheral device such as a customer display, handheld scanner, or wireless LAN unit. |
|
4 |
USB connector (USB-A - Device Charging) The USB connector color is white |
Connects a USB cable for connecting to a tablet computer. Enables data communication with the tablet while charging it. |
|
5 |
Power supply connector |
Connects the DC cable for the AC adapter. |
|
6 |
USB Type-B connector |
Connects the USB cable for connecting to computers. |
|
7 |
Drawer kick connector |
Connects the modular cable for the cash drawer. |
|
8 |
Status sheet button |
Initializes the interface settings or prints a status sheet to verify the settings. |
 CAUTION:
When a tablet computer is connected to the USB connector (USB-A - Device Charging), the Bluetooth function of the printer is disabled.
To use the Bluetooth function keeping the tablet connected to the connector, disable the USB data communication. For more details, see the Technical Reference Guide.
Before Using the Printer
Part Names
Setup
Basic Operations
Cleaning
Troubleshooting
Appendix
Top > Part Names > Connectors
Connectors
The on-board connectors vary depending on the printer model.
|
1 |
Ethernet connector |
Connects the 10BASE-T/100BASE-TX LAN cable. |
|
2 |
Serial connector |
Connects a serial cable. |
|
3 |
Power supply connector |
Connects the DC cable for the AC adapter. |
|
4 |
USB Type-B connector |
Connects the USB cable for connecting to computers. |
|
5 |
Drawer kick connector |
Connects the modular cable for the cash drawer. |
|
6 |
Status sheet button |
Initializes the interface settings or prints a status sheet to verify the settings. |
|
1 |
Ethernet connector |
Connects the 10BASE-T/100BASE-TX LAN cable. |
|
2,3 |
USB Type-A connector The USB connector color is black |
For connecting a peripheral device such as a customer display, handheld scanner, or wireless LAN unit. |
|
4 |
USB connector (USB-A - Device Charging) The USB connector color is white |
Connects a USB cable for connecting to a tablet computer. Enables data communication with the tablet while charging it. |
|
5 |
Power supply connector |
Connects the DC cable for the AC adapter. |
|
6 |
USB Type-B connector |
Connects the USB cable for connecting to computers. |
|
7 |
Drawer kick connector |
Connects the modular cable for the cash drawer. |
|
8 |
Status sheet button |
Initializes the interface settings or prints a status sheet to verify the settings. |
CAUTION:When a tablet computer is connected to the USB connector (USB-A - Device Charging), the Bluetooth function of the printer is disabled.
To use the Bluetooth function keeping the tablet connected to the connector, disable the USB data communication. For more details, see the Technical Reference Guide.