
Before Using the Printer
Part Names
Setup
Basic Operations
Cleaning
Troubleshooting
Appendix
Top > Setup > Changing the Paper Width
Changing the Paper Width
The printer allows you to use three widths roll paper.
The factory default setting is to use 58 mm width roll paper.
 |
 |
 |
|
Attach 58-mm width roll paper guide to the right (Default) |
No roll paper guide |
Attach 58-mm width roll paper guide to the right Attach 40-mm width roll paper guide to the left |
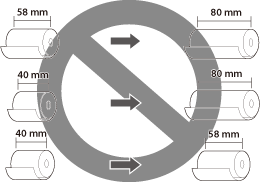
 CAUTION:
You cannot change the paper width to a wider paper width after you have used the printer. Because parts of the print head that had not touched paper may be damaged by being rubbed against the platen roller, and the autocutter may have worn out.
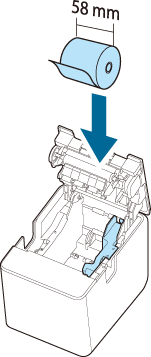
Using 58 mm Wide Roll Paper
Attach only the 58-mm width roll paper guide. This is the factory default.
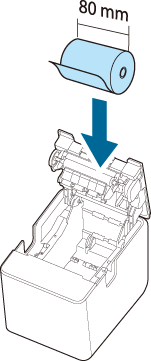
Using 80 mm Wide Roll Paper
Remove all the roll paper guides.
Follow the procedure below to remove the 58-mm width roll paper guide.
-
Lay the printer on its side.
-
Open the roll paper cover.
-
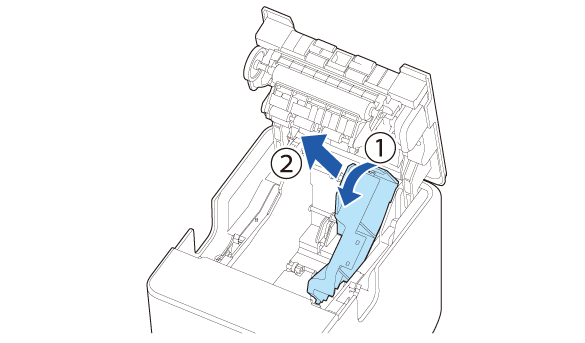
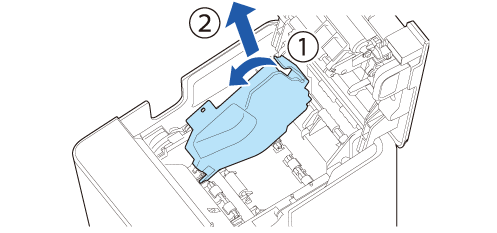
Remove the roll paper guide by pulling its tab up and toward you.
 Note:
Note:-
When you turn the printer on, the printer automatically changes the paper width setting to 80 mm. It is not necessary to change the setting by using TM-L100 Utility or other software.
-
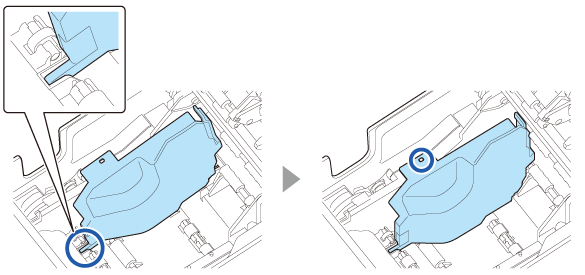
How to attach the 58-mm width roll paper guide
Tilt the guide and insert its protrusion into the groove inside the printer, and then fit it into place.
The pins on the printer fit into the positioning holes in the guide.
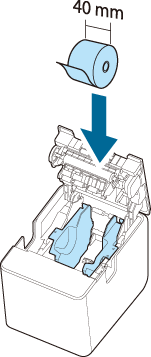
Using 40 mm Wide Roll Paper
Attach both the 40-mm and 58-mm width roll paper guides.
Follow the procedure below to attach the 40-mm width roll paper guide.
-
Lay the printer on its side.
-
Open the roll paper cover.
-
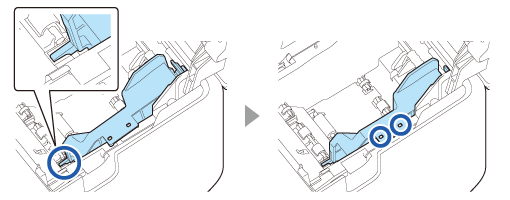
Tilt the guide and insert its protrusion into the groove inside the printer, and then fit it into place.
-
By using TM-L100 Utility, change the paper width setting of the printer to 40 mm.
The pin on the printer fits into the positioning hole in the guide.
For more details, see the TM-L100 Technical Reference Guide.
Note:How to remove the 40-mm width roll paper guide
Remove the roll paper guide by pulling its tab up and toward you.
Before Using the Printer
Part Names
Setup
Basic Operations
Cleaning
Troubleshooting
Appendix
Top > Setup > Changing the Paper Width
Changing the Paper Width
The printer allows you to use three widths roll paper.
The factory default setting is to use 58 mm width roll paper.
|
|
|
|
|
Attach 58-mm width roll paper guide to the right (Default) |
No roll paper guide |
Attach 58-mm width roll paper guide to the right Attach 40-mm width roll paper guide to the left |
CAUTION:You cannot change the paper width to a wider paper width after you have used the printer. Because parts of the print head that had not touched paper may be damaged by being rubbed against the platen roller, and the autocutter may have worn out.
Using 58 mm Wide Roll Paper
Attach only the 58-mm width roll paper guide. This is the factory default.
Using 80 mm Wide Roll Paper
Remove all the roll paper guides.
Follow the procedure below to remove the 58-mm width roll paper guide.
-
Lay the printer on its side.
-
Open the roll paper cover.
-
Remove the roll paper guide by pulling its tab up and toward you.
Note:-
When you turn the printer on, the printer automatically changes the paper width setting to 80 mm. It is not necessary to change the setting by using TM-L100 Utility or other software.
-
How to attach the 58-mm width roll paper guide
Tilt the guide and insert its protrusion into the groove inside the printer, and then fit it into place.
The pins on the printer fit into the positioning holes in the guide.
Using 40 mm Wide Roll Paper
Attach both the 40-mm and 58-mm width roll paper guides.
Follow the procedure below to attach the 40-mm width roll paper guide.
-
Lay the printer on its side.
-
Open the roll paper cover.
-
Tilt the guide and insert its protrusion into the groove inside the printer, and then fit it into place.
-
By using TM-L100 Utility, change the paper width setting of the printer to 40 mm.
The pin on the printer fits into the positioning hole in the guide.
For more details, see the TM-L100 Technical Reference Guide.
Note:How to remove the 40-mm width roll paper guide
Remove the roll paper guide by pulling its tab up and toward you.