
Before Using the Printer
Part Names
Setup
Basic Operations
Cleaning
Troubleshooting
Appendix
Top > Troubleshooting > When the Roll Paper Cover does Not Open
When the Roll Paper Cover does Not Open
The roll paper cover will not open until the auto cutter blade returns to its standard position. Turn off the printer and back on. If you still cannot open the roll paper cover, follow the procedure below to return the auto cutter blade to its standard position.
-
Turn off the printer.
-
Disconnect the AC cable from the power outlet.
-
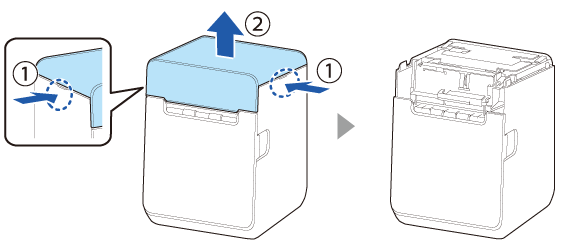
Remove the top cover.
-
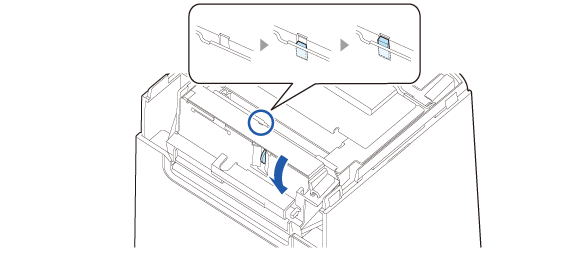
Turn the knob in the direction of the arrow to gradually raise the tip of the part shown in the figure.
-
Open the roll paper cover, and remove jammed paper.
-
Close the roll paper cover.
-
Attach the top cover.
While pressing the cutout portions on both sides of the printer, pull the cover up.
When the tip is raised to the top, the auto cutter blade returns to its standard position.
Check that you can open the roll paper cover.
Before Using the Printer
Part Names
Setup
Basic Operations
Cleaning
Troubleshooting
Appendix
Top > Troubleshooting > When the Roll Paper Cover does Not Open
When the Roll Paper Cover does Not Open
The roll paper cover will not open until the auto cutter blade returns to its standard position. Turn off the printer and back on. If you still cannot open the roll paper cover, follow the procedure below to return the auto cutter blade to its standard position.
-
Turn off the printer.
-
Disconnect the AC cable from the power outlet.
-
Remove the top cover.
-
Turn the knob in the direction of the arrow to gradually raise the tip of the part shown in the figure.
-
Open the roll paper cover, and remove jammed paper.
-
Close the roll paper cover.
-
Attach the top cover.
While pressing the cutout portions on both sides of the printer, pull the cover up.
When the tip is raised to the top, the auto cutter blade returns to its standard position.
Check that you can open the roll paper cover.