
Before Using the Printer
Part Names
Setup
Basic Operations
Cleaning
Troubleshooting
Appendix
Top > Setup > Connecting to Power Source
Connecting to Power Source
Connect the AC adapter to supply power to the printer.
 WARNING:
-
Be sure to use the specified AC adapter PS-190 (Model: M368A) only. Using another AC adapter may result in causing fire or shock.
-
Be sure to use the AC cable that came with the printer.
-
Never insert the AC cable plug into a socket that does not meet the input voltage of the AC adapter. Doing so may result in damage to the printer.
-
Should a fault ever occur, immediately turn off the power to the printer and unplug the AC cable from the socket.
Connecting the AC Adapter
-
Connect the AC cable to the AC adapter.
-
Lay the printer on its side.
-
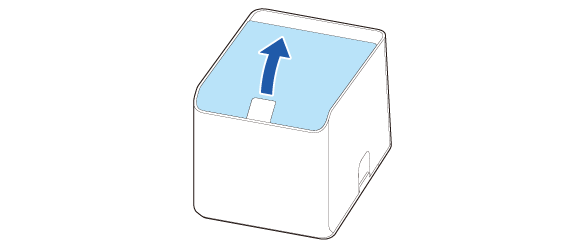
Remove the rear cover.
-
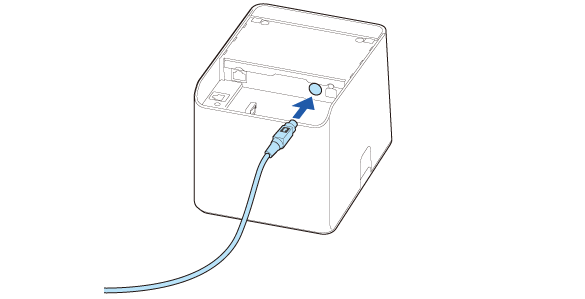
Connect the DC cable of the AC adapter to the power supply connector.
-
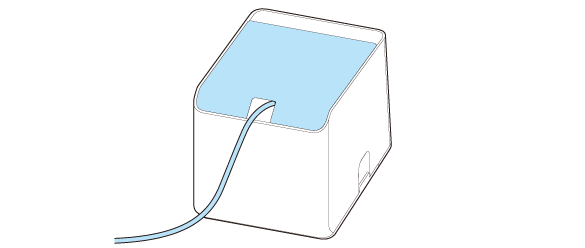
Attach the rear cover. Pull out the DC cable through the cutout of the rear cover.
-
Connect the AC cable plug to a power outlet.

If you need to connect interface cables, skip next steps and go to Connecting Interface Cables.
 Note:
Note:How to disconnect the DC cable
Make sure that the AC cable is not connected, and then hold the arrow-printed portion of the connector to pull it straight out.

 WARNING:
Should a fault ever occur, immediately turn off the power to the printer and unplug the AC cable from the socket.
Before Using the Printer
Part Names
Setup
Basic Operations
Cleaning
Troubleshooting
Appendix
Top > Setup > Connecting to Power Source
Connecting to Power Source
Connect the AC adapter to supply power to the printer.
WARNING:-
Be sure to use the specified AC adapter PS-190 (Model: M368A) only. Using another AC adapter may result in causing fire or shock.
-
Be sure to use the AC cable that came with the printer.
-
Never insert the AC cable plug into a socket that does not meet the input voltage of the AC adapter. Doing so may result in damage to the printer.
-
Should a fault ever occur, immediately turn off the power to the printer and unplug the AC cable from the socket.
Connecting the AC Adapter
-
Connect the AC cable to the AC adapter.
-
Lay the printer on its side.
-
Remove the rear cover.
-
Connect the DC cable of the AC adapter to the power supply connector.
-
Attach the rear cover. Pull out the DC cable through the cutout of the rear cover.
-
Connect the AC cable plug to a power outlet.
If you need to connect interface cables, skip next steps and go to Connecting Interface Cables.
Note:How to disconnect the DC cable
Make sure that the AC cable is not connected, and then hold the arrow-printed portion of the connector to pull it straight out.
WARNING:Should a fault ever occur, immediately turn off the power to the printer and unplug the AC cable from the socket.