About Epson FastFoto
How to Scan Photos
Step 1: Organizing Photos
Step 2: Placing Photos into the Scanner
Step 3: Scanning and Saving Photos
Sharing Photos
Uploading Photos
Editing Photos
Changing the Displayed Folder and Thumbnail View
Epson FastFoto Settings
Organization Tab
Enhancements Tab
Scan Settings Tab
Advanced Settings Tab
Upload Tab
Scanner Settings Tab
Tips for Using Epson FastFoto
Scanning Instant Photos
Scanning Panoramic Photos
Scanning Back Side Notes on Photos
Enabling or Disabling Glass Surface Dirt Alert
Changing the Application to Scan from the Scan Button
Troubleshooting
Straight Lines Appear
The Image Quality Is Poor
Pressing the Scanner Button Does Not Start Epson FastFoto
Cannot Share or Upload the Photos to a Web Service
Appendix
Internet Connection
Depending on the dirt, it may not be detected correctly.
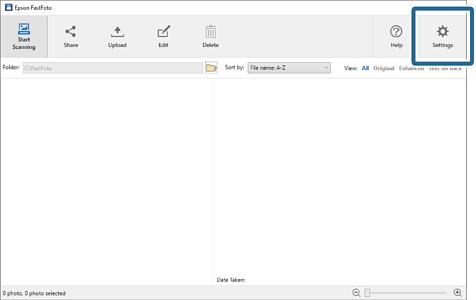
1Click Settings on the main screen.
The Epson FastFoto Settings screen is displayed.
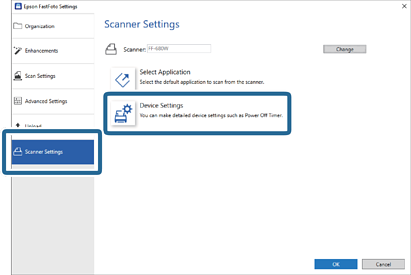
2Click Device Settings on the Scanner Settings tab.
The Epson Scan 2 Utility screen is displayed.
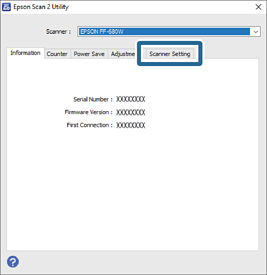
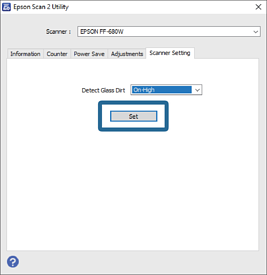
3Select the Scanner Setting tab.
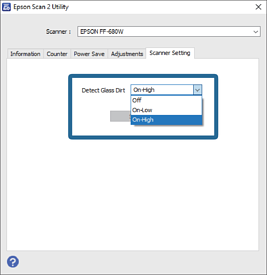
4Under the Detect Glass Dirt dropdown menu, select On-Low or On-High.
If you want to disable the detection, select Off.
5Click Set.
6Close the Epson Scan 2 Utility screen.