Introduction
Basic Operations
Creating a Variety of Labels
Printing
Changing Preference Settings
Appendix
Top > Basic Operations > Creating Labels for Label Editor Mobile
Creating Labels for Label Editor Mobile
Label Editor Mobile is an application that allows you to create and edit labels on your smart device. If your printer is compatible with Label Editor Mobile, you can transfer labels created with Label Editor to your smart device and print them using Label Editor Mobile.
 Label Editor Mobile compatible printers
 Note: Note:
|
-
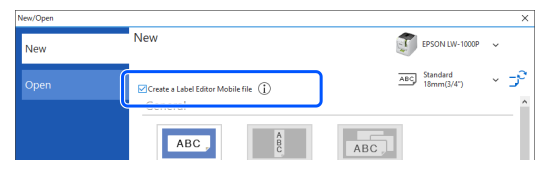
Click on the New/Open window or the tool bar.
-
Select the check box for "Create a Label Editor Mobile file".
-
Select the printer and tape that you use.
-
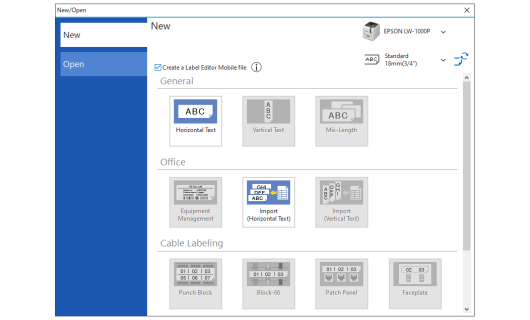
Select a label type you want to create.
-
A template for the selected label type is displayed. Insert objects such as text and symbol.
-
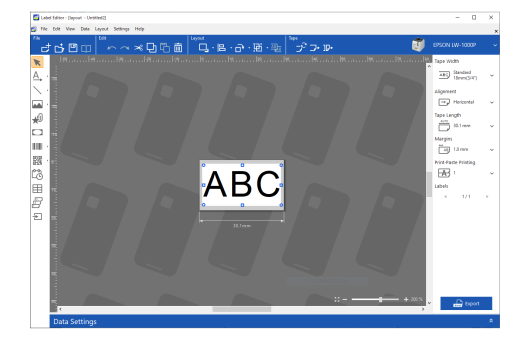
The background of the label editing window is different from the normal background.
-
Functions and settings that are not supported in this Label Editor Mobile mode are displayed in gray and cannot be selected.
Label Editor enters into the dedicated mode for creating labels for Label Editor Mobile.
|
Note: Label types that are not supported in this Label Editor Mobile mode are displayed in gray and cannot be selected. |
|
Note: |
Transferring Label Data to Your Smart Device
-
Click on the right side of the window.
-
Save the file by specifying a location to save and the file name. The file is saved under the specified name with ".lemd" extension.
-
Once a file is saved with the extension ".lemd", it cannot be reopened in Label Editor.
If you want to open and edit the file again in Label Editor, click on the toolbar and save the file. (The file is saved with ".leb" extension.)
-
You can directly print the file by clicking "Print" in the File menu.
-
Transfer the saved file to your smart device.
-
Connect the smart device to the printer.
-
Start Label Editor Mobile. Open the transferred file from File reference and tap the Print button to print the file.
Or, select Export a Label Editor Mobile file from the File menu.
|
Note: An error message that says "Label Editor Mobile file cannot be exported" may appear. In that case, make changes such as reducing the font size or reducing the number of blocks. |
|
Note: |
For example, if you save the file to a cloud service, you can open the file from your smart device.
Google Play is a trademark of Google LLC.
App Store is a trademark of Apple Inc., registered in the U.S. and other countries.
Introduction
Basic Operations
Creating a Variety of Labels
Printing
Changing Preference Settings
Appendix
Top > Basic Operations > Creating Labels for Label Editor Mobile
Creating Labels for Label Editor Mobile
Label Editor Mobile is an application that allows you to create and edit labels on your smart device. If your printer is compatible with Label Editor Mobile, you can transfer labels created with Label Editor to your smart device and print them using Label Editor Mobile.
Label Editor Mobile compatible printers
Note:
|
-
Click on the New/Open window or the tool bar.
-
Select the check box for "Create a Label Editor Mobile file".
-
Select the printer and tape that you use.
-
Select a label type you want to create.
-
A template for the selected label type is displayed. Insert objects such as text and symbol.
-
The background of the label editing window is different from the normal background.
-
Functions and settings that are not supported in this Label Editor Mobile mode are displayed in gray and cannot be selected.
Label Editor enters into the dedicated mode for creating labels for Label Editor Mobile.
|
Note: Label types that are not supported in this Label Editor Mobile mode are displayed in gray and cannot be selected. |
|
Note: |
Transferring Label Data to Your Smart Device
-
Click on the right side of the window.
-
Save the file by specifying a location to save and the file name. The file is saved under the specified name with ".lemd" extension.
-
Once a file is saved with the extension ".lemd", it cannot be reopened in Label Editor.
If you want to open and edit the file again in Label Editor, click on the toolbar and save the file. (The file is saved with ".leb" extension.)
-
You can directly print the file by clicking "Print" in the File menu.
-
Transfer the saved file to your smart device.
-
Connect the smart device to the printer.
-
Start Label Editor Mobile. Open the transferred file from File reference and tap the Print button to print the file.
Or, select Export a Label Editor Mobile file from the File menu.
|
Note: An error message that says "Label Editor Mobile file cannot be exported" may appear. In that case, make changes such as reducing the font size or reducing the number of blocks. |
|
Note: |
For example, if you save the file to a cloud service, you can open the file from your smart device.
Google Play is a trademark of Google LLC.
App Store is a trademark of Apple Inc., registered in the U.S. and other countries.