Introduction
Basic Operations
Creating a Variety of Labels
Printing
Changing Preference Settings
Appendix
Top > Creating a Variety of Labels > Adding an Automatic Serialization Object in Labels
Adding an Automatic Serialization Object in Labels
You can create multiple labels with a series of numbers or alphanumeric codes. Only by setting the starting value for the series and specifying the number of copies, you can print serialized labels.
Example:

-
Click on the tool box.
-
Make the automatic serialization settings.
-
Click at a position you want to insert the automatic serialization object.
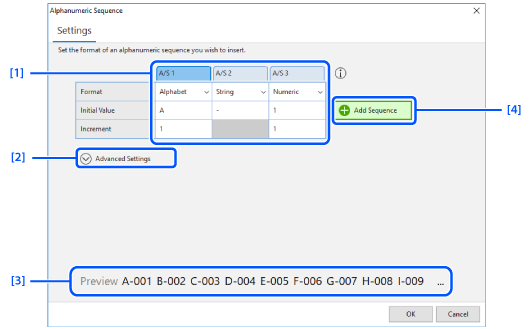
The setting window is displayed.
|
1. |
Set the starting value and change the increment setting if needed. |
|
2. |
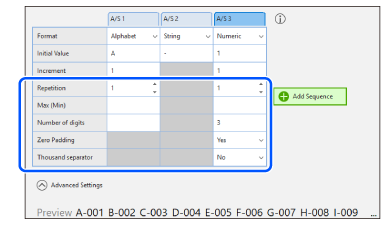
Click this to make the advanced settings. To create the example labels, change the settings in the A/S 3 column as shown below.
|
|
3. |
The result of your settings is shown here. Check whether the result is shown as intended. |
|
4. |
Lets you add an element of starting value. |
 Note: Note:To delete a column Move the mouse pointer over the header of the column you want to delete, and click . |
The object is inserted with the icon.


To print serialized labels
Specify the number of serialized labels (number of copies) in the print dialog box.
Introduction
Basic Operations
Creating a Variety of Labels
Printing
Changing Preference Settings
Appendix
Top > Creating a Variety of Labels > Adding an Automatic Serialization Object in Labels
Adding an Automatic Serialization Object in Labels
You can create multiple labels with a series of numbers or alphanumeric codes. Only by setting the starting value for the series and specifying the number of copies, you can print serialized labels.
Example:
-
Click on the tool box.
-
Make the automatic serialization settings.
-
Click at a position you want to insert the automatic serialization object.
The setting window is displayed.
|
1. |
Set the starting value and change the increment setting if needed. |
|
2. |
Click this to make the advanced settings. To create the example labels, change the settings in the A/S 3 column as shown below.
|
|
3. |
The result of your settings is shown here. Check whether the result is shown as intended. |
|
4. |
Lets you add an element of starting value. |
|
Note: To delete a column Move the mouse pointer over the header of the column you want to delete, and click . |
The object is inserted with the icon.
To print serialized labels
Specify the number of serialized labels (number of copies) in the print dialog box.