Introduction
Basic Operations
Creating a Variety of Labels
Printing
Changing Preference Settings
Appendix
Top > Creating a Variety of Labels > Creating Labels for Equipment Tagging (Equipment Management)
Creating Labels for Equipment Tagging (Equipment Management)
You can create labels for equipment tagging easily by using the templates.

Importing a List of Equipment from an Excel File
By importing your existing Excel file, you can create labels without entering data manually.
 Note: Note:Because you can select a worksheet, columns and rows to use for labels, you do not need to change your Excel file to match the template in advance. |
-
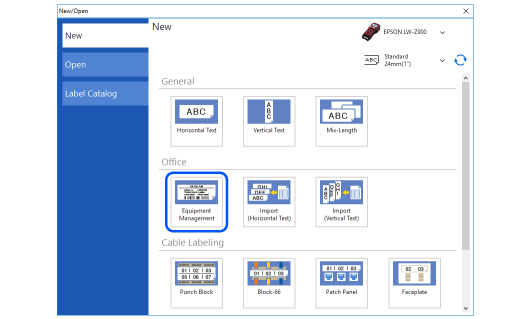
Click on the tool bar.
-
Click Equipment Management.
-
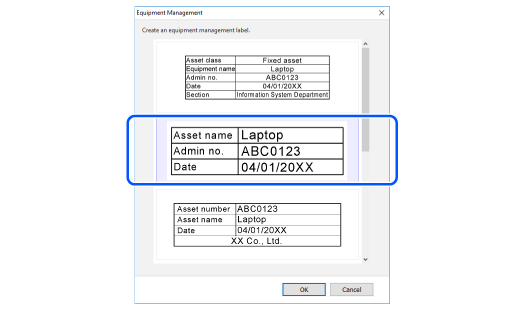
Select a template you want to use, and then click OK.
-
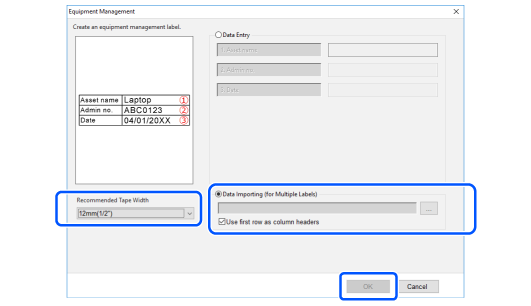
Make the settings below, and then click OK.
-
Select a tape width from Recommended Tape Width
-
Select Data Importing (for Multiple Labels) and then select the Excel file to import.
-
Select which worksheet to import, and then click OK.
-
Edit the label if needed.
-
When inserting barcodes, change the attribute of the column that contains barcode data.
-
You can change font type and size settings for each block.
-
Click to print the file.
A label image with the data of the first row is displayed in the Layout editing window.
|
Note: |

Entering Equipment Data Manually
-
Follow step 1 to 3 of "Importing a List of Equipment from an Excel File".
-
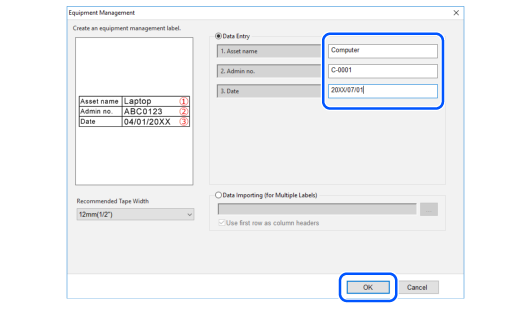
Select Data Entry, enter data, and then click OK.
|
Note: When creating multiple labels, leave the entry fields blank and click OK. You can enter data easily in the Data creation window. |
Introduction
Basic Operations
Creating a Variety of Labels
Printing
Changing Preference Settings
Appendix
Top > Creating a Variety of Labels > Creating Labels for Equipment Tagging (Equipment Management)
Creating Labels for Equipment Tagging (Equipment Management)
You can create labels for equipment tagging easily by using the templates.
Importing a List of Equipment from an Excel File
By importing your existing Excel file, you can create labels without entering data manually.
|
Note: Because you can select a worksheet, columns and rows to use for labels, you do not need to change your Excel file to match the template in advance. |
-
Click on the tool bar.
-
Click Equipment Management.
-
Select a template you want to use, and then click OK.
-
Make the settings below, and then click OK.
-
Select a tape width from Recommended Tape Width
-
Select Data Importing (for Multiple Labels) and then select the Excel file to import.
-
Select which worksheet to import, and then click OK.
-
Edit the label if needed.
-
When inserting barcodes, change the attribute of the column that contains barcode data.
-
You can change font type and size settings for each block.
-
Click to print the file.
A label image with the data of the first row is displayed in the Layout editing window.
|
Note: |
Entering Equipment Data Manually
-
Follow step 1 to 3 of "Importing a List of Equipment from an Excel File".
-
Select Data Entry, enter data, and then click OK.
|
Note: When creating multiple labels, leave the entry fields blank and click OK. You can enter data easily in the Data creation window. |