Introduction
Basic Operations
Creating a Variety of Labels
Printing
Changing Preference Settings
Appendix
Top > Printing > Printing Labels
Printing Labels
-
Click on the right side of the window.
-
Make the print settings, and then click Print.
Printing is started.

|
1. |
Specify the number of copies. |
|
2. |
Click this to display the printer driver properties window. You can change the tape settings, cut settings, etc. |
|
3. |
Click this to make the settings for serialized labels, or labels created using the Data creation window or using the Print-Paste Printing function. |
Borderless Printing
If your printer supports borderless printing, you can print labels without top, bottom, left and right margins.
 Printers that support Borderless Printing
-
In the tape settings area, click the Margins setting, and select the Borderless Printing check box.
All margins disappears from the label image in the Layout editing window, and entire print area is used as the label area.

Printing Labels with Serialization Object or Labels Created Using the Data Creation Window (Advanced Settings)
On the Print dialog box, click Advanced Settings and make the necessary settings.

|
1. |
Select this check box to print labels with automatic serialization object. |
|
2. |
Select this check box to print multiple labels created using the Data creation window. |
|
3. |
If you have selected rows to print in the Data creation window, select this check box. |
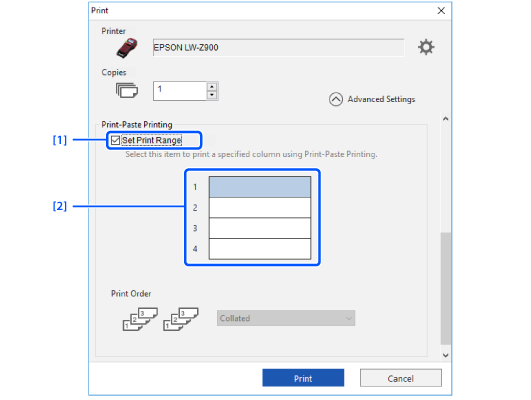
Printing Labels created using the Print-Paste Printing Function (Advanced Settings)
You can select one or more pieces of the divided label, and print only the selected pieces. Scroll to the bottom of the Advanced Settings window, and make the settings in Print-Paste Printing.
|
1. |
Select this check box to enable selection of pieces of the label to print. Clear this check box to print the all pieces. |
|
2. |
Click on a piece you want to print. |
Introduction
Basic Operations
Creating a Variety of Labels
Printing
Changing Preference Settings
Appendix
Top > Printing > Printing Labels
Printing Labels
-
Click on the right side of the window.
-
Make the print settings, and then click Print.
Printing is started.
|
1. |
Specify the number of copies. |
|
2. |
Click this to display the printer driver properties window. You can change the tape settings, cut settings, etc. |
|
3. |
Click this to make the settings for serialized labels, or labels created using the Data creation window or using the Print-Paste Printing function. |
Borderless Printing
If your printer supports borderless printing, you can print labels without top, bottom, left and right margins.
Printers that support Borderless Printing
-
In the tape settings area, click the Margins setting, and select the Borderless Printing check box.
All margins disappears from the label image in the Layout editing window, and entire print area is used as the label area.
Printing Labels with Serialization Object or Labels Created Using the Data Creation Window (Advanced Settings)
On the Print dialog box, click Advanced Settings and make the necessary settings.
|
1. |
Select this check box to print labels with automatic serialization object. |
|
2. |
Select this check box to print multiple labels created using the Data creation window. |
|
3. |
If you have selected rows to print in the Data creation window, select this check box. |
Printing Labels created using the Print-Paste Printing Function (Advanced Settings)
You can select one or more pieces of the divided label, and print only the selected pieces. Scroll to the bottom of the Advanced Settings window, and make the settings in Print-Paste Printing.
|
1. |
Select this check box to enable selection of pieces of the label to print. Clear this check box to print the all pieces. |
|
2. |
Click on a piece you want to print. |