Introduction
Basic Operations
Creating a Variety of Labels
Printing
Changing Preference Settings
Appendix
Top > Creating a Variety of Labels > Creating Cable Labels
Creating Cable Labels
You can easily create various types of labels for wiring and cables.
The following explains how to create labels for Punch Block.

-
Click on the tool bar.
-
Click Punch Block.
-
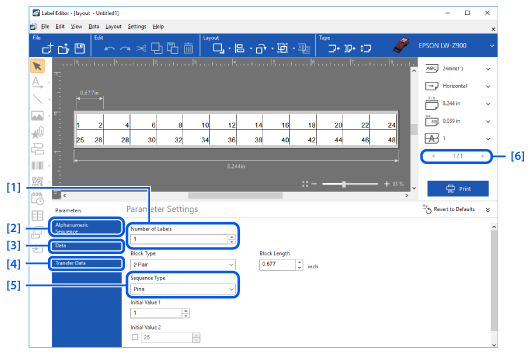
Make the settings in the Parameter Settings area.
-
Click to print the file.
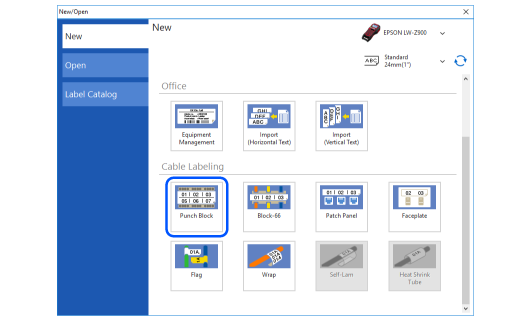
 Note: Note:Label types that are not available with the set tape are grayed out and not selectable. |
|
1. |
Specify the number of serialized labels. |
|
2. | |
|
3. |
Displays the Data creation window. If you have selected Blank/Data importing at [5], you can import a file in csv, xls, or xlsx format. |
|
4. |
If your printer supports Data Transfer Tool, you can transfer the label file to the printer. However, Self-Lam and Heat Shrink Tube files cannot be transferred. |
|
5. |
Select Alphanumeric Sequence to set up automatic serialization. Select Blank/Data importing to enter pin numbers manually, or to import data from an Excel or other format file. |
|
6. |
Lets you view the second and subsequent labels when you have specified more than one number of labels at [1]. |

|
Note: Font type and size settings are applied to all the labels in the file. |
Introduction
Basic Operations
Creating a Variety of Labels
Printing
Changing Preference Settings
Appendix
Top > Creating a Variety of Labels > Creating Cable Labels
Creating Cable Labels
You can easily create various types of labels for wiring and cables.
The following explains how to create labels for Punch Block.
-
Click on the tool bar.
-
Click Punch Block.
-
Make the settings in the Parameter Settings area.
-
Click to print the file.
|
Note: Label types that are not available with the set tape are grayed out and not selectable. |
|
1. |
Specify the number of serialized labels. |
|
2. | |
|
3. |
Displays the Data creation window. If you have selected Blank/Data importing at [5], you can import a file in csv, xls, or xlsx format. |
|
4. |
If your printer supports Data Transfer Tool, you can transfer the label file to the printer. However, Self-Lam and Heat Shrink Tube files cannot be transferred. |
|
5. |
Select Alphanumeric Sequence to set up automatic serialization. Select Blank/Data importing to enter pin numbers manually, or to import data from an Excel or other format file. |
|
6. |
Lets you view the second and subsequent labels when you have specified more than one number of labels at [1]. |
|
Note: Font type and size settings are applied to all the labels in the file. |