Introduction
Basic Operations
Creating a Variety of Labels
Printing
Changing Preference Settings
Appendix
Top > Creating a Variety of Labels > Transferring Label Files to Printer (Data Transfer Tool)
Transferring Label Files to Printer (Data Transfer Tool)
If your printer supports Data Transfer Tool, you can transfer the following files to the printer.
-
Cable label file (created by the following functions; Punch Block, Block-66, Patch Panel, Faceplate, Flag, or Wrap)
-
Label file created by the Mix-Length function
-
Image file (BMP, JPG, PNG)
 Printers that support Data Transfer Tool
The transferred file is stored in the printer’s memory. You can print the label directly from the printer without using a computer.
 Note: Note:A minor adjustment of the transferred file may be needed on the printer. Check the file using the preview function of the printer before printing it. |
The following explains how to transfer a cable label file ( Creating Cable Labels).
For instructions on how to open the transferred file, see the printer manual.
-
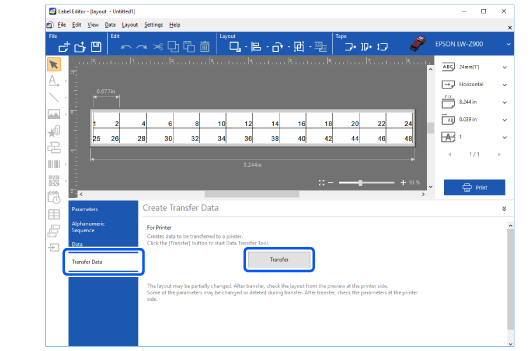
Select Transfer Data, and then click the Transfer button.
-
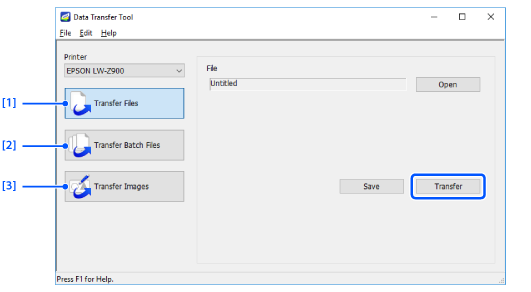
Select Transfer Files, and then click the Transfer button.
Data Transfer Tool is started.
|
1. |
Select this to transfer a single file. |
|
2. |
Select this to transfer more than one files (file extension is .dt3) that were saved using Data Transfer Tool. |
|
3. |
If your printer supports image transfer function, you can transfer image files in BMP, JPEG, or PNG format to the printer. Click the Load button and select an image file to transfer. Printers that support the image transfer function |
|
Note: To save the file under a new file name on the computer, click the Save button. The file is saved in transferable format (file extension is .dt3). |
Introduction
Basic Operations
Creating a Variety of Labels
Printing
Changing Preference Settings
Appendix
Top > Creating a Variety of Labels > Transferring Label Files to Printer (Data Transfer Tool)
Transferring Label Files to Printer (Data Transfer Tool)
If your printer supports Data Transfer Tool, you can transfer the following files to the printer.
-
Cable label file (created by the following functions; Punch Block, Block-66, Patch Panel, Faceplate, Flag, or Wrap)
-
Label file created by the Mix-Length function
-
Image file (BMP, JPG, PNG)
Printers that support Data Transfer Tool
The transferred file is stored in the printer’s memory. You can print the label directly from the printer without using a computer.
|
Note: A minor adjustment of the transferred file may be needed on the printer. Check the file using the preview function of the printer before printing it. |
The following explains how to transfer a cable label file ( Creating Cable Labels).
For instructions on how to open the transferred file, see the printer manual.
-
Select Transfer Data, and then click the Transfer button.
-
Select Transfer Files, and then click the Transfer button.
Data Transfer Tool is started.
|
1. |
Select this to transfer a single file. |
|
2. |
Select this to transfer more than one files (file extension is .dt3) that were saved using Data Transfer Tool. |
|
3. |
If your printer supports image transfer function, you can transfer image files in BMP, JPEG, or PNG format to the printer. Click the Load button and select an image file to transfer. Printers that support the image transfer function |
|
Note: To save the file under a new file name on the computer, click the Save button. The file is saved in transferable format (file extension is .dt3). |