-
-
-
-
Network Service and Software Information
-
Application for Scanning Documents and Images (Epson Scan 2)
-
Application for Configuring Scanning Operations from the Control Panel (Epson Event Manager)
-
Application for Quick and Fun Printing from a Computer (Epson Photo+)
-
Application for Easily Operating the Printer from a Smart device (Epson Smart Panel)
-
Application for Updating Software and Firmware (Epson Software Updater)
-
-
-
Cleaning the Translucent Film
When the printout is not improved after aligning the print head or cleaning the paper path, the translucent film inside the printer may be smeared.
Items required:
-
Cotton swabs (several)
-
Water with a few drops of detergent (2 to 3 drops of detergent in 1/4 cup of tap water)
-
Light for checking smears
Do not use cleaning liquid other than water with a few drops of detergent.
-
Turn off the printer by pressing the
 button.
-
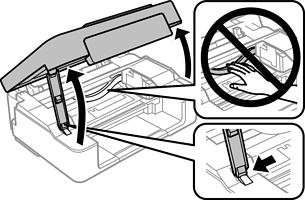
Open the scanner unit.

-
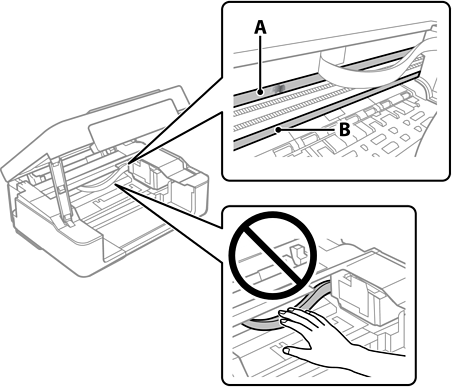
Check if the translucent film is smeared. Smears are easier to see if you use a light.
If there are smears (such as finger marks or grease) on the translucent film (A), go to the next step.

A: Translucent film
B: Rail
Important:Be careful not to touch the rail (B). Otherwise, you may not be able to print. Do not wipe off the grease on the rail, because this is necessary for operations.
-
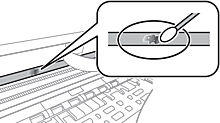
Moisten a cotton swab with the water with a few drops of detergent so that it is not dripping water, and then wipe the smeared part.
 Important:
Wipe off the smear gently. If you press the cotton swab too hard to the film, the springs of the film may be dislocated and the printer may be damaged.
-
Use a new dry cotton swab to wipe the film.
Important:Do not leave any fibers on the film.
Note:To prevent the smear from spreading, frequently replace the cotton swab with a new one.
-
Repeat steps 4 and 5 until the film is not smeared.
-
Visually check that the film is not smeared.