
Before Using the Printer
Part Names
Setup of the Printer
Setup of the Tablet
Basic Operations
Cleaning
Troubleshooting
Appendix
Top > Before Using the Printer > Checking Items Included with the Printer
Checking Items Included with the Printer
The following items are included with the printer. If any item is damaged or missing, contact qualified service personnel. Other items may be included depending on the printer model.
|
Included items |
Explanation |
|
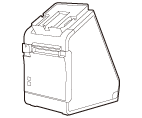 |
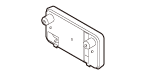
Printer |
Printer unit |
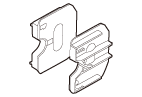 |
58-mm width roll paper guides |
Attach these guides when using 58 mm wide roll paper. |
 |
Roll paper (free sample) |
Use this for testing the printer. |
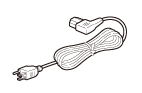 |
AC cable |
With this cable, connect the AC adapter to a power outlet. |
 |
Power switch cover |
Attach this cover to prevent pressing the power switch by mistake. |
 |
Front tablet attachment |
Attach this to a tablet to be used as a front tablet. |
 |
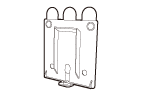
Rear display attachment |
Attach this to a device to be used as a rear display. |
 |
Rear display fixture |
Use this to secure the rear display attachment to the printer. |
 |
Hexagonal spanner (stored in the recess on the bottom of the printer) |
Use this to tighten or loosen the screws of the printer. |
 |
Two screws |
Use them to mount the front tablet and rear display. |
 |
Thumb screw |
Use this to mount the front tablet. |
 |
Three adhesive strips (large) |
Spare adhesive strips for the front tablet attachment. |
 |
Two adhesive strips (small) |
Spare adhesive strips for the rear display attachment. |
 |
Attachment guide sheet |
Use this sheet to attach the attachment to a front tablet. |
 |
Documents |
Provide instructions and restrictions on the use of the product. |
Before Using the Printer
Part Names
Setup of the Printer
Setup of the Tablet
Basic Operations
Cleaning
Troubleshooting
Appendix
Top > Before Using the Printer > Checking Items Included with the Printer
Checking Items Included with the Printer
The following items are included with the printer. If any item is damaged or missing, contact qualified service personnel. Other items may be included depending on the printer model.
|
Included items |
Explanation |
|
|
|
Printer |
Printer unit |
|
|
58-mm width roll paper guides |
Attach these guides when using 58 mm wide roll paper. |
|
|
Roll paper (free sample) |
Use this for testing the printer. |
|
|
AC cable |
With this cable, connect the AC adapter to a power outlet. |
|
|
Power switch cover |
Attach this cover to prevent pressing the power switch by mistake. |
|
|
Front tablet attachment |
Attach this to a tablet to be used as a front tablet. |
|
|
Rear display attachment |
Attach this to a device to be used as a rear display. |
|
|
Rear display fixture |
Use this to secure the rear display attachment to the printer. |
|
|
Hexagonal spanner (stored in the recess on the bottom of the printer) |
Use this to tighten or loosen the screws of the printer. |
|
|
Two screws |
Use them to mount the front tablet and rear display. |
|
|
Thumb screw |
Use this to mount the front tablet. |
|
|
Three adhesive strips (large) |
Spare adhesive strips for the front tablet attachment. |
|
|
Two adhesive strips (small) |
Spare adhesive strips for the rear display attachment. |
|
|
Attachment guide sheet |
Use this sheet to attach the attachment to a front tablet. |
|
|
Documents |
Provide instructions and restrictions on the use of the product. |