
Before Using the Printer
Part Names
Setup of the Printer
Setup of the Tablet
Basic Operations
Cleaning
Troubleshooting
Appendix
Top > Setup of the Tablet > Mounting the DM-D70
Mounting the DM-D70
You can mount the DM-D70 to the rear of the printer. For information about the DM-D70, see the DM-D70 User‘s Manual.
 https://support.epson.net/publist/bsredirect.php?code=m001340
Orientation of the DM-D70
The DM-D70 can be mounted to the printer as a rear display in either landscape and portrait orientation. Mount the DM-D70 in either one of the orientations that can be used by your application software.
Landscape Orientation
Mount the DM-D70 matching its orientation with the mark indicated on its back side.
Portrait Orientation
Because of the characteristic of the DM-D70, the screen may look dark depending on the angle from which it is viewed. Choose one of the following two installation methods, Normal or Upside Down, according to the angle you actually view the screen.
Make sure to match the screen orientation with the mark indicated on its back side.
|
Normal |
Upside Down |
|
The screen looks bright when it is viewed from the left side, and looks dark when it is viewed from the right side. 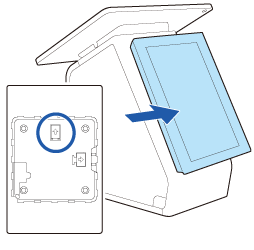 |
The screen looks bright when it is viewed from the right side, and looks dark when it is viewed from the left side. 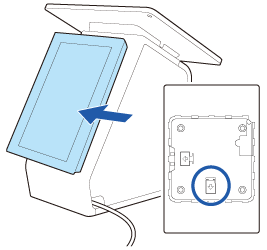 When you mount the DM-D70 in this way, flip the display orientation vertically using DM-D70 Utility, TM-m30II Utility, or TM Utility. |
How to Get and Use the Utility
How to Get
Download one of the following utilities from the website shown below.
For customers in North America  www.epson.com/support/
For customers in other countries https://epson.sn
-
DM-D70 Utility (For Windows)
-
TM-m30II Utility Ver.1.20 or later (For Windows)
-
TM Utility Ver.3.18.0 or later (For Android/iOS)
How to Use
Start the utility and change [Display Settings] - [Display direction] to [Upside down] to flip the screen vertically.
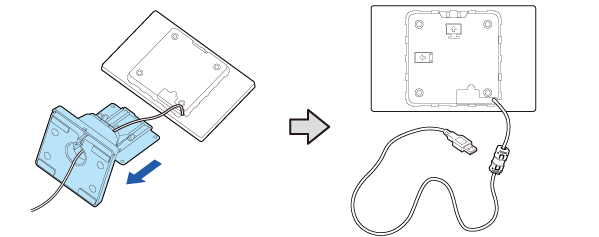
Disassembling the DM-D70
-
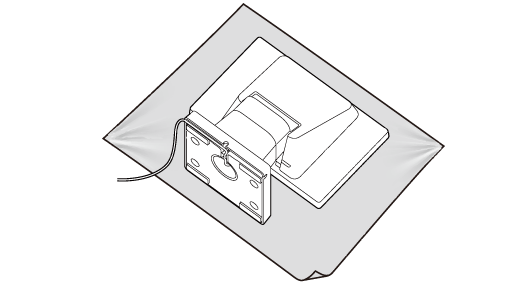
Place the product screen-side down on a soft cloth or the like.
-
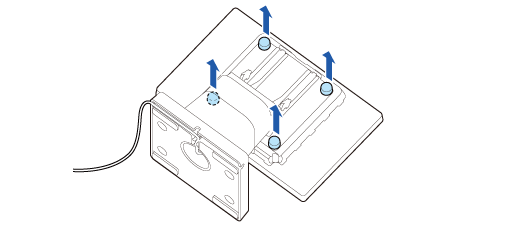
Remove the rear cover.
-
Remove the four screws.
-
Remove the stand and then pull out the USB cable from the stand.

 Note:
Note:When mounting the DM-D70 in portrait orientation
A ferrite core has been attached to the USB cable of the DM-D70. When mounting the DM-D70 in portrait orientation, the ferrite core cannot be stored inside the printer unless the position of the ferrite core is changed. If you want to store the ferrite core inside the printer, move the ferrite core to the center of the USB cable in advance.
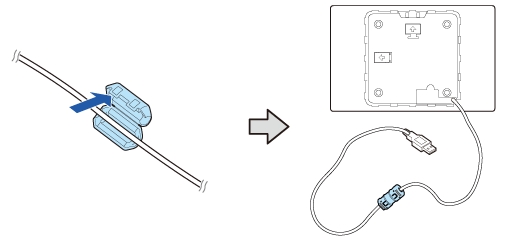
 CAUTION:
Do not remove the ferrite core from the USB cable. If you use the DM-D70 without the ferrite core, the DM-D70 may malfunction due to electrical noise.
Mounting the DM-D70 to the Printer
-
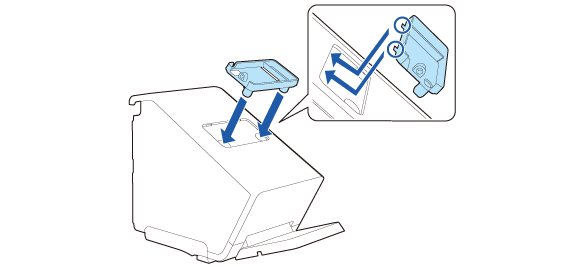
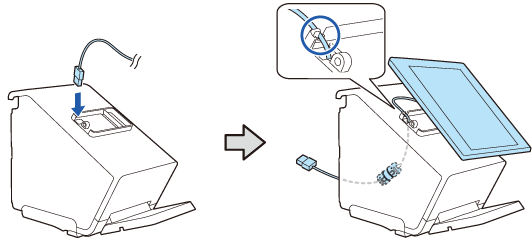
Attach the rear display fixture.
-
Secure the fixture with the two screws.
-
Run the cable of the DM-D70 through the printer.
-
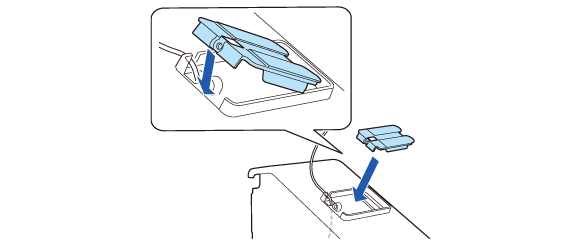
Attach the rear display attachment.
-
Secure it with the included screw.
-
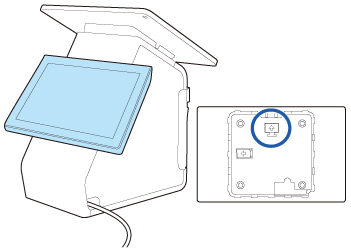
Place the DM-D70 on the attachment to check the pasting position.
-
About the orientation of the DM-D70, see the following link.
-
Place the DM-D70 horizontally.
-
Remove the two backing sheets.
-
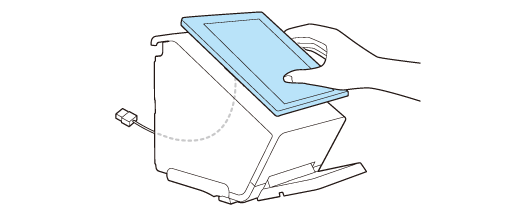
Place the DM-D70 on the attachment, then press it firmly for about 30 seconds.
-
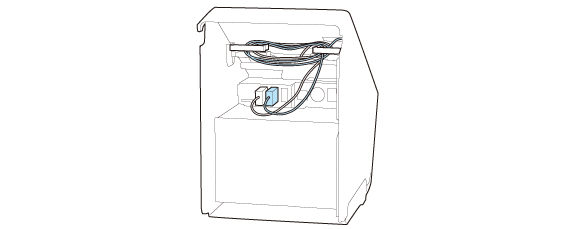
Adjust the cable length that is coming out from the printer. Ensure enough length of cable to prevent it from being bent at a sharp angle.
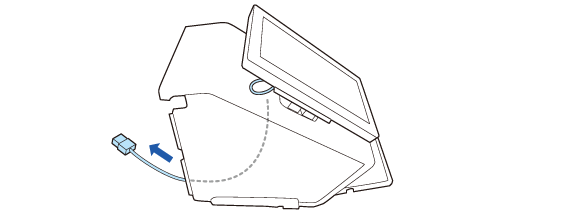
-
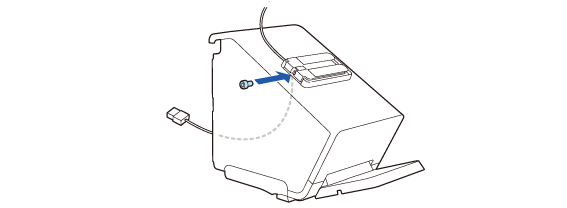
Connect the USB cable to the USB-A connector.
-
Bundle the excess cable by routing it through clamps on the both sides.

Put the ferrite core inside the printer.


 CAUTION:
Do not connect to the USB-A Device Charging (iPad 2.1A) connector. The connector cannot be used for the DM-D70.
Before Using the Printer
Part Names
Setup of the Printer
Setup of the Tablet
Basic Operations
Cleaning
Troubleshooting
Appendix
Top > Setup of the Tablet > Mounting the DM-D70
Mounting the DM-D70
You can mount the DM-D70 to the rear of the printer. For information about the DM-D70, see the DM-D70 User‘s Manual.
https://support.epson.net/publist/bsredirect.php?code=m001340
Orientation of the DM-D70
The DM-D70 can be mounted to the printer as a rear display in either landscape and portrait orientation. Mount the DM-D70 in either one of the orientations that can be used by your application software.
Landscape Orientation
Mount the DM-D70 matching its orientation with the mark indicated on its back side.
Portrait Orientation
Because of the characteristic of the DM-D70, the screen may look dark depending on the angle from which it is viewed. Choose one of the following two installation methods, Normal or Upside Down, according to the angle you actually view the screen.
Make sure to match the screen orientation with the mark indicated on its back side.
|
Normal |
Upside Down |
|
The screen looks bright when it is viewed from the left side, and looks dark when it is viewed from the right side. |
The screen looks bright when it is viewed from the right side, and looks dark when it is viewed from the left side. When you mount the DM-D70 in this way, flip the display orientation vertically using DM-D70 Utility, TM-m30II Utility, or TM Utility. |
How to Get and Use the Utility
How to Get
Download one of the following utilities from the website shown below.
For customers in North America www.epson.com/support/
For customers in other countries https://epson.sn
-
DM-D70 Utility (For Windows)
-
TM-m30II Utility Ver.1.20 or later (For Windows)
-
TM Utility Ver.3.18.0 or later (For Android/iOS)
How to Use
Start the utility and change [Display Settings] - [Display direction] to [Upside down] to flip the screen vertically.
Disassembling the DM-D70
-
Place the product screen-side down on a soft cloth or the like.
-
Remove the rear cover.
-
Remove the four screws.
-
Remove the stand and then pull out the USB cable from the stand.
Note:When mounting the DM-D70 in portrait orientation
A ferrite core has been attached to the USB cable of the DM-D70. When mounting the DM-D70 in portrait orientation, the ferrite core cannot be stored inside the printer unless the position of the ferrite core is changed. If you want to store the ferrite core inside the printer, move the ferrite core to the center of the USB cable in advance.
CAUTION:Do not remove the ferrite core from the USB cable. If you use the DM-D70 without the ferrite core, the DM-D70 may malfunction due to electrical noise.
Mounting the DM-D70 to the Printer
-
Attach the rear display fixture.
-
Secure the fixture with the two screws.
-
Run the cable of the DM-D70 through the printer.
-
Attach the rear display attachment.
-
Secure it with the included screw.
-
Place the DM-D70 on the attachment to check the pasting position.
-
About the orientation of the DM-D70, see the following link.
-
Place the DM-D70 horizontally.
-
Remove the two backing sheets.
-
Place the DM-D70 on the attachment, then press it firmly for about 30 seconds.
-
Adjust the cable length that is coming out from the printer. Ensure enough length of cable to prevent it from being bent at a sharp angle.
-
Connect the USB cable to the USB-A connector.
-
Bundle the excess cable by routing it through clamps on the both sides.
Put the ferrite core inside the printer.
CAUTION:Do not connect to the USB-A Device Charging (iPad 2.1A) connector. The connector cannot be used for the DM-D70.