
Before Using the Printer
Part Names
Setup of the Printer
Setup of the Tablet
Basic Operations
Cleaning
Troubleshooting
Appendix
Top > Basic Operations > How to Secure the Printer
How to Secure the Printer
If you want to secure the printer to the installation site such as a table, use the optional tape (model number: DF-10). Because hook and loop fastening system is used, the tape consists of two sheets.
Follow the procedure below to secure the printer with the tape.
-
Turn off the printer.
-
Disconnect the AC cable plug from the power outlet.
-
Dismount the front tablet and the rear display.
-
Lay the printer down.
-
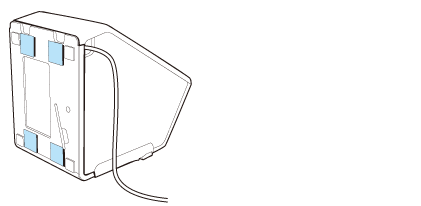
Remove the backing sheet from the tape.
-
Attach four pieces of the tape to the bottom of the printer, and then remove another backing sheet from each tape.
-
Place the printer on the installation surface, and then hold the printer down to secure it.
 Mounting/Dismounting the Front Tablet
Mounting/Dismounting the Rear Display
 Note:
Note:-
To remove the printer from the installation surface disengaging the hook and loop fastener tape, apply a force to peel the printer from the surface. However, if you repeat removing and reattaching the tape multiple times, the tape may become less cohesive. In such case, replace the tape (DF-10) with new ones.
-
Since four pieces of the tape need to be attached to the printer, you need two sets of DF-10 at a time.
Before Using the Printer
Part Names
Setup of the Printer
Setup of the Tablet
Basic Operations
Cleaning
Troubleshooting
Appendix
Top > Basic Operations > How to Secure the Printer
How to Secure the Printer
If you want to secure the printer to the installation site such as a table, use the optional tape (model number: DF-10). Because hook and loop fastening system is used, the tape consists of two sheets.
Follow the procedure below to secure the printer with the tape.
-
Turn off the printer.
-
Disconnect the AC cable plug from the power outlet.
-
Dismount the front tablet and the rear display.
-
Lay the printer down.
-
Remove the backing sheet from the tape.
-
Attach four pieces of the tape to the bottom of the printer, and then remove another backing sheet from each tape.
-
Place the printer on the installation surface, and then hold the printer down to secure it.
Mounting/Dismounting the Front Tablet
Mounting/Dismounting the Rear Display
Note:-
To remove the printer from the installation surface disengaging the hook and loop fastener tape, apply a force to peel the printer from the surface. However, if you repeat removing and reattaching the tape multiple times, the tape may become less cohesive. In such case, replace the tape (DF-10) with new ones.
-
Since four pieces of the tape need to be attached to the printer, you need two sets of DF-10 at a time.