
Before Using the Printer
Part Names
Setup of the Printer
Setup of the Tablet
Basic Operations
Cleaning
Troubleshooting
Appendix
Top > Setup of the Tablet > Preparation for Setup
Preparation for Setup
Make the following preparations to mount a front tablet and a rear display.
Preparation of Tablet and Display
-
Prepare a tablet to be used as a front tablet, and a cable to connect the tablet and the printer.
 Tablets that Can be Mounted to the Printer
-
Prepare a device to be used as a rear display, and a cable to connect the display and the printer.
Tablets that Can be Mounted to the Printer
Spreading a Sheet of Soft Material over a Work Table
Spread a sheet of soft cloth or other soft material over a work table. This is to prevent the printer, tablets, and the table from being scratched or damaged.
Cleaning the Back Side of the Tablet and Display
For attaching the attachment, clean the back side of the tablet and the display, and then let the back side dry well.
Make sure to completely remove any greasy stains.

 CAUTION:
The attachment cannot be attached to a cover or case of the tablet or display. Make sure to remove a cover or case.
Hexagonal Spanner
You need the hexagonal spanner to loosen or tighten screws during the setup.
The hexagonal spanner is stored in the recess on the bottom of the printer.
Remove the spanner from the recess using a ballpoint pen or similar tool.
After using the spanner, put it back in the recess.
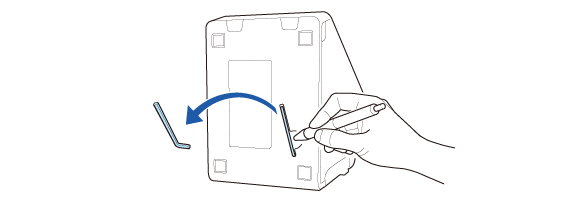 CAUTION:
-
Do not attempt to remove the spanner with your finger. Doing so may cause your nail to chip or crack.
-
Do not tighten the screws too much with the hexagonal spanner. Too much force may cause the printer frame to deform or may strip the screw head.
Before Using the Printer
Part Names
Setup of the Printer
Setup of the Tablet
Basic Operations
Cleaning
Troubleshooting
Appendix
Top > Setup of the Tablet > Preparation for Setup
Preparation for Setup
Make the following preparations to mount a front tablet and a rear display.
Preparation of Tablet and Display
-
Prepare a tablet to be used as a front tablet, and a cable to connect the tablet and the printer.
Tablets that Can be Mounted to the Printer
-
Prepare a device to be used as a rear display, and a cable to connect the display and the printer.
Tablets that Can be Mounted to the Printer
Spreading a Sheet of Soft Material over a Work Table
Spread a sheet of soft cloth or other soft material over a work table. This is to prevent the printer, tablets, and the table from being scratched or damaged.
Cleaning the Back Side of the Tablet and Display
For attaching the attachment, clean the back side of the tablet and the display, and then let the back side dry well.
Make sure to completely remove any greasy stains.
CAUTION:The attachment cannot be attached to a cover or case of the tablet or display. Make sure to remove a cover or case.
Hexagonal Spanner
You need the hexagonal spanner to loosen or tighten screws during the setup.
The hexagonal spanner is stored in the recess on the bottom of the printer.
Remove the spanner from the recess using a ballpoint pen or similar tool.
After using the spanner, put it back in the recess.
CAUTION:-
Do not attempt to remove the spanner with your finger. Doing so may cause your nail to chip or crack.
-
Do not tighten the screws too much with the hexagonal spanner. Too much force may cause the printer frame to deform or may strip the screw head.