
Before Using the Printer
Part Names
Setup of the Printer
Setup of the Tablet
Basic Operations
Cleaning
Troubleshooting
Appendix
Top > Setup of the Tablet > Tablets that Can be Mounted to the Printer
Tablets that Can be Mounted to the Printer
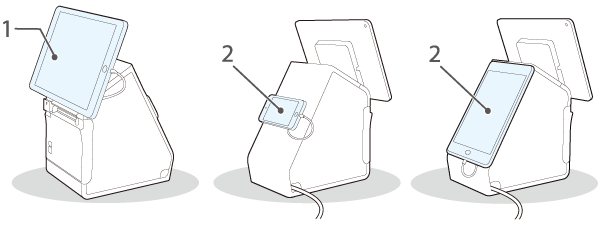
You can mount your tablet to the printer as if the tablet is a built-in display.
1: Front tablet
2: Rear display
 CAUTION:
If you mount a tablet in portrait orientation as the front tablet, the connector of the tablet may face downward. In such case, route the cable of the tablet avoiding the paper ejection slot.
The tablets that can be connected to the printer and the available USB connectors are as shown below. To know the location of the USB connectors, see Connectors.
" " means that the device can be connected.
" " means that availability varies by device to device.
"--" means that it is not supported.
|
Type |
Product name |
USB connector |
Mounting position |
|||
|
USB-A - Device Charging |
USB-A |
Type-B |
||||
|
Data communication |
Charging |
Charging |
Data communication |
|||
|
Apple device*1*6 |
iPad (5th generation) iPad (6th generation) iPad (7th generation) |
|
|
-- |
-- |
Front |
|
iPad Air 2 |
||||||
|
iPad Pro (3rd generation) iPad Pro (4th generation) |
-- |
-- |
-- |
-- |
Front |
|
|
iPad mini 4 |
|
|
|
-- |
Front/Rear |
|
|
iPod touch (7th generation) |
-- |
-- |
|
-- |
Rear |
|
|
Windows tablet *6 |
-- |
-- |
-- |
|
Front/Rear |
|
|
Android device *6 |
|
|
-- |
|
Front/Rear |
|
|
DM-D70 |
-- |
-- |
(power supply only) |
-- |
Rear |
|
|
*1 |
A device equipped with a Lightning connector can be used. Use a genuine Apple or MFi Certified Lightning to USB Cable. If you use a non-certified (non MFi) Lightning Cable, or use an extension cable, data communication and charging may not be performed normally. |
|
*2 |
When a tablet computer is connected to the USB-A - Device Charging connector, the Bluetooth function of the printer is disabled. To charge the device keeping it connected via Bluetooth, change the Interface selection setting to "Bluetooth only". For more details, see the Technical Reference Guide. However, if you do so, the maximum supply current is limited to 0.5 A, which may not be enough for charging some types of tablet. Please use the tablet after testing and evaluating it adequately. |
|
*3 |
Depending on the settings or usage conditions of the device, it may not be fully charged. To fully charge the device, darken its screen or take such other measures to reduce power consumption. |
|
*4 |
When connecting an Android device for data communication, make sure that the device satisfies the following requirements. Requirements: The version of Android OS is 10 or later with kernel version 4.9.15 or later However, Epson does not guarantee normal operation of all Android devices even if they satisfy the requirements. Run some tests before actually using the device. |
|
*5 |
The device must be compatible with an OTG cable and must be capable of acting as a USB host. |
|
*6 |
For more detailed information about tablets that can be used with the printer, see the link below. |
 Note:
Note:If your tablet is not allowed to connect to the USB connector of the printer, pull out its cable through the cutout of the printer just like the AC cable.
Before Using the Printer
Part Names
Setup of the Printer
Setup of the Tablet
Basic Operations
Cleaning
Troubleshooting
Appendix
Top > Setup of the Tablet > Tablets that Can be Mounted to the Printer
Tablets that Can be Mounted to the Printer
You can mount your tablet to the printer as if the tablet is a built-in display.
1: Front tablet
2: Rear display
CAUTION:If you mount a tablet in portrait orientation as the front tablet, the connector of the tablet may face downward. In such case, route the cable of the tablet avoiding the paper ejection slot.
The tablets that can be connected to the printer and the available USB connectors are as shown below. To know the location of the USB connectors, see Connectors.
"" means that the device can be connected.
"" means that availability varies by device to device.
"--" means that it is not supported.
|
Type |
Product name |
USB connector |
Mounting position |
|||
|
USB-A - Device Charging |
USB-A |
Type-B |
||||
|
Data communication |
Charging |
Charging |
Data communication |
|||
|
Apple device*1*6 |
iPad (5th generation) iPad (6th generation) iPad (7th generation) |
|
|
-- |
-- |
Front |
|
iPad Air 2 |
||||||
|
iPad Pro (3rd generation) iPad Pro (4th generation) |
-- |
-- |
-- |
-- |
Front |
|
|
iPad mini 4 |
|
|
|
-- |
Front/Rear |
|
|
iPod touch (7th generation) |
-- |
-- |
|
-- |
Rear |
|
|
Windows tablet *6 |
-- |
-- |
-- |
|
Front/Rear |
|
|
Android device *6 |
|
|
-- |
|
Front/Rear |
|
|
DM-D70 |
-- |
-- |
(power supply only) |
-- |
Rear |
|
|
*1 |
A device equipped with a Lightning connector can be used. Use a genuine Apple or MFi Certified Lightning to USB Cable. If you use a non-certified (non MFi) Lightning Cable, or use an extension cable, data communication and charging may not be performed normally. |
|
*2 |
When a tablet computer is connected to the USB-A - Device Charging connector, the Bluetooth function of the printer is disabled. To charge the device keeping it connected via Bluetooth, change the Interface selection setting to "Bluetooth only". For more details, see the Technical Reference Guide. However, if you do so, the maximum supply current is limited to 0.5 A, which may not be enough for charging some types of tablet. Please use the tablet after testing and evaluating it adequately. |
|
*3 |
Depending on the settings or usage conditions of the device, it may not be fully charged. To fully charge the device, darken its screen or take such other measures to reduce power consumption. |
|
*4 |
When connecting an Android device for data communication, make sure that the device satisfies the following requirements. Requirements: The version of Android OS is 10 or later with kernel version 4.9.15 or later However, Epson does not guarantee normal operation of all Android devices even if they satisfy the requirements. Run some tests before actually using the device. |
|
*5 |
The device must be compatible with an OTG cable and must be capable of acting as a USB host. |
|
*6 |
For more detailed information about tablets that can be used with the printer, see the link below. |
Note:If your tablet is not allowed to connect to the USB connector of the printer, pull out its cable through the cutout of the printer just like the AC cable.