
Before Using the Printer
Part Names
Setup of the Printer
Setup of the Tablet
Basic Operations
Cleaning
Troubleshooting
Appendix
Top > Setup of the Tablet > How to Attach the Spare Adhesive Strips to the Attachment
How to Attach the Spare Adhesive Strips to the Attachment
Follow the procedure below to attach the spare adhesive strips to the attachment.
-
Clean the attachment surface where the strips are attached, and then let the surface dry well.
-
From the adhesive strip, remove the backing sheet with “Command“ letters printed in red.
-
Attach the strip to the attachment, and press it firmly for about 30 seconds.


Make sure to align the corner and edges of the strip with the lines on the attachment.
 CAUTION:
Make sure to attach three strips to the front tablet attachment, and attach two strips to the rear display attachment.
Before Using the Printer
Part Names
Setup of the Printer
Setup of the Tablet
Basic Operations
Cleaning
Troubleshooting
Appendix
Top > Setup of the Tablet > How to Attach the Spare Adhesive Strips to the Attachment
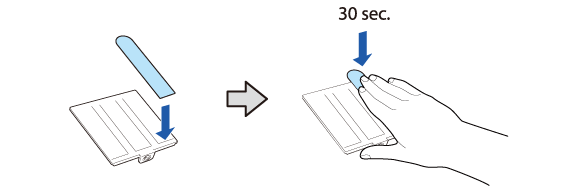
How to Attach the Spare Adhesive Strips to the Attachment
Follow the procedure below to attach the spare adhesive strips to the attachment.
-
Clean the attachment surface where the strips are attached, and then let the surface dry well.
-
From the adhesive strip, remove the backing sheet with “Command“ letters printed in red.
-
Attach the strip to the attachment, and press it firmly for about 30 seconds.
Make sure to align the corner and edges of the strip with the lines on the attachment.
CAUTION:Make sure to attach three strips to the front tablet attachment, and attach two strips to the rear display attachment.