Scanning Documents (Document Mode)
Using Document Mode in Epson Scan 2, you can scan originals using detailed settings that are suitable for text documents.
-
Place the originals.
-
Start Epson Scan 2.
-
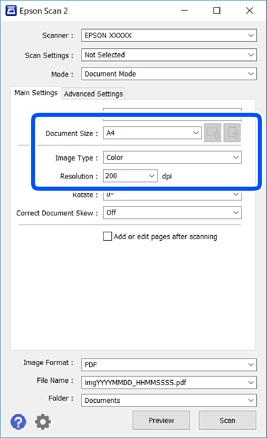
Select Document Mode from the Mode list.
-
Make the following settings on the Main Settings tab.
-
Document Size: Select the size of the original you placed.
-
 /
/  (Original orientation) buttons: Select the set orientation of the original you placed. Depending on the size of the original, this item may be set automatically and cannot be changed.
-
Image Type: Select the color for saving the scanned image.
-
Resolution: Select the resolution.
Note:-
The Document Source setting is fixed as Scanner Glass. You cannot change this setting.
-
If you set Add or edit pages after scanning, you can scan additional originals after scanning the original. In addition, if you set the Image Format as PDF or Multi-TIFF, you can save the scanned images as one file.
-
-
Make other scan settings if necessary.
-
You can preview the scanned image by clicking the Preview button. The preview window opens, and the previewed image is displayed.
-
On the Advanced Settings tab, you can make detailed image adjustment settings that are suitable for text documents, such as the following.
-
Remove Background: Remove the background of the originals.
-
Text Enhancement: You can make blurred letters in the original clear and sharp.
-
Auto Area Segmentation: You can make letters clear and images smooth when performing black and white scanning for a document that contains images.
-
Color Enhance: You can enhance the color specified for the scanned image, and then save it in grayscale or black and white.
-
Brightness: You can adjust the brightness for the scanned image.
-
Contrast: You can adjust the contrast for the scanned image.
-
Gamma: You can adjust the gamma (brightness of the intermediate range) for the scanned image.
-
Threshold: You can adjust the border for monochrome binary (black and white).
-
Unsharp Mask: You can enhance and sharpen the outlines of the image.
-
Descreening: You can remove moiré patterns (web-like shadows) that appear when scanning printed papers such as a magazine.
-
Edge Fill: You can remove the shadow created around the scanned image.
-
Dual Image Output (Windows Only): You can scan once and save two images with different output settings at the same time.
-
Note:The items may not be available depending on other settings you made.
-
-
Set the file saving settings.

-
Image Format: Select the save format from the list.You can make detailed settings for each save format except BITMAP and PNG. Select Options from the list after selecting the save format.
-
File Name: Confirm the save file name displayed.You can change settings for the file name by selecting Settings from the list.
-
Folder: Select the save folder for the scanned image from the list.You can select another folder or create a new folder by selecting Select from the list.
-
-
Click Scan.
