Printing Basics - Mac OS
Explanations in the section use TextEdit as an example. Operations and screens differ depending on the application. See the application's help for details.
-
Load paper in the printer.
-
Open the file you want to print.
-
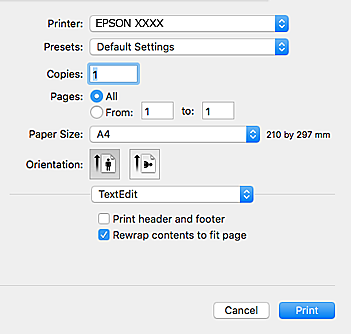
Select Print from the File menu or another command to access the print dialog.
If necessary, click Show Details or
 to expand the print window.
-
Make the following settings.
-
Printer: Select your printer.
-
Presets: Select when you want to use the registered settings.
-
Paper Size: Select the paper size you loaded in the printer.When printing with no margins, select a "borderless" paper size.
-
Orientation: Select the orientation you set in the application.
Note:-
If the above setting menus are not displayed, close the print window, select Page Setup from the File menu, and then make settings.
-
When printing on envelopes, select landscape orientation.
-
-
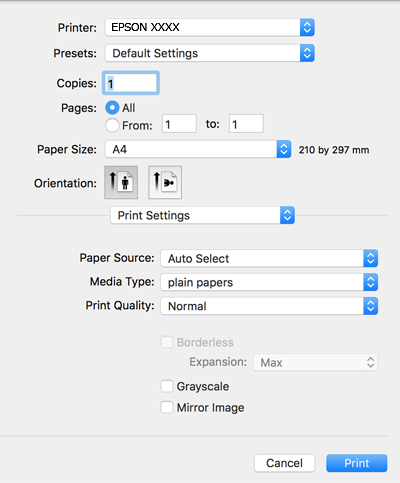
Select Print Settings from the pop-up menu.
 Note:
Note:On OS X Mountain Lion or later, if the Print Settings menu is not displayed, the Epson printer driver has not been installed correctly.
Select System Preferences from the
 menu > Printers & Scanners (or Print & Scan, Print & Fax), remove the printer, and then add the printer again. See the following to add a printer.
-
Make the following settings.
-
Media Type: Select the type of paper you loaded.
-
Print Quality: Select the print quality.Selecting Fine provides higher quality printing, but the printing speed may be slower.
-
Expansion: Available when selecting a borderless paper size.In borderless printing, the print data is enlarged slightly more than the paper size so that no margins are printed around the edges of the paper. Select the amount of enlargement.
-
Grayscale: Select to print in black or shades of gray.
-
-
Click Print.
